The Wiki for Tale 4 is in read-only mode and is available for archival and reference purposes only. Please visit the current Tale 11 Wiki in the meantime.
If you have any issues with this Wiki, please post in #wiki-editing on Discord or contact Brad in-game.
Difference between revisions of "User:Cegaiel/Macros/CarpBlade"
| Line 6: | Line 6: | ||
[[User:Cegaiel/Macros/CarpBlade/Code |Get Code!]] | [[User:Cegaiel/Macros/CarpBlade/Code |Get Code!]] | ||
<BR> | <BR> | ||
| − | [[Media:Carpblade t5.zip | Download EXE]] | + | [[Media:Carpblade t5.zip | Download EXE]] (in .zip) |
Revision as of 09:57, 24 September 2010
Carpentry Blade 1680x1050 (Autohotkey)
CREDIT: Full credit for the actual carp blade making portion goes to Oni's Carpentry Blade Macro 1680x1050 script, based off his ACTools macro. I simply converted it to Autohotkey and added some very useful features/hotkeys for more ease and flexiblity. I'm not a big Actools fan and I dont trust it to make more than 1 blade at a time (batches). Theres no way to tell if the blade you are about to start making is even in the right position or at what coords. And if you do get a good quality blade, you have to blindly hope you are pointing your mouse at the same spot when you make your next blade. The features I added to this script addresses all my issues.
Get Code!
Download EXE (in .zip)
- Make 6.5k - 6.6k carpentry blades in about 10 seconds (Single keyboard click to repeat previously sucessful blades).
- Works only in 1680x1050 screen resolution
- Asks if you're using Copper or Iron metal
- Double F8 View zoom all the way in (script will do this automatically for you, so ignore this).
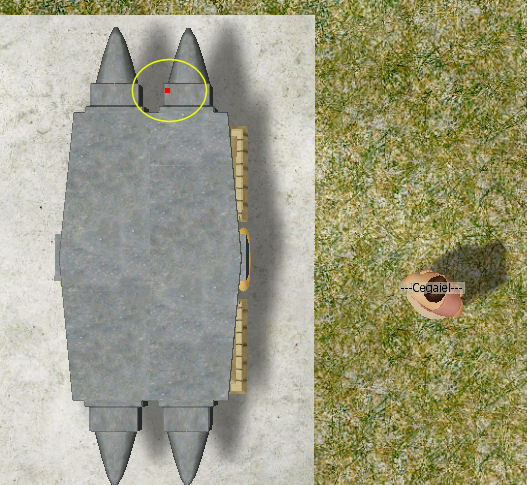
- Place mouse on starting position (while hovering red dot, in image 1 & 2, below).
- Press F2 to start making a blade (or Right Ctrl to make blade from a previously successful location - no need to move mouse with this option, position is irrelevent since it uses coords from memory)
Hotkeys: (That work while the script is active/idle)
- F1 Help Screen
- F2 Make a blade and store coordinates into script memory AND clipboard
Note: The only purpose of putting into clipboard is in case you're about to log out of the game. Next time you log on (assuming you didn't move your avatar, you can just click the same coords you were using your previous session (this is where Left Shift comes into play). You can paste your last coords with Ctrl+V into notepad at anytime for later reference. If your avatar moves even a half of a step, then those coords will not be valid anymore.
- Right Alt: Make another blade from last F2 coordinates (memory)
- Left Shift: Show current mouse position
- Right Shift: Show last F2 coordinates (memory)
Hotkeys you use after making a blade:
- Left Alt: Approve and unload a blade into your inventory (Automatically clicks Complete Project on menu).
Note: If you uncomment the next to last line: Gosub, Load (uncomment meaning remove the comment/ignore tag ;) then pressing Left Ctrl will not only unload the blade, but will execute RCtrl automatically after unloading. This means it will start another blade immediately (based on last valid F2 mouse position). Expedites making large quantities of blades. After you are comfortable with the script, I recommend you use this. - SPACEBAR: Discard project and recover metal (Automatically clicks Discard on menu)
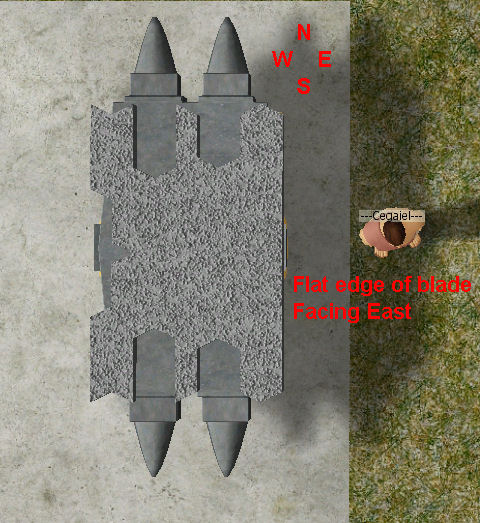
Your Anvil MUST be aligned North to South. When loaded, the cutting edge of the blade must face East.
Why: When you Double F8, the screen automatically changes to have North at top of screen, South at bottom of screen.
By default (I believe) when you build an Anvil in your compound, it will automatically be in the correct position. If should be facing North to South and the flat edge part will be on the east (right). If you build your anvil as is (don't rotate) then it should be in the correct position (I believe)
Starting Position to begin macro (F2 key) at:

