The Wiki for Tale 6 is in read-only mode and is available for archival and reference purposes only. Please visit the current Tale 11 Wiki in the meantime.
If you have any issues with this Wiki, please post in #wiki-editing on Discord or contact Brad in-game.
Difference between revisions of "User:Obol/FountainGuide"
| (16 intermediate revisions by the same user not shown) | |||
| Line 10: | Line 10: | ||
<BR><BR> | <BR><BR> | ||
| − | Notice the images below; | + | Notice the images below; the left one illustrates the 5 basins and their configuration screens and the right one is the main interface for the fountain design. |
| − | + | The interface is accessed by clicking on the mechanism and using the <b>Adjust the Fountain</b> option. On the interface the grey dot is the mechanism(sorry, you can only see half of it at the top), the yellow dot is you and the larger circles are the basins. The small dots in the basins are nozzles. You can access the basin's configuration screens by clicking on a basin and hitting the <b>Config</b> button. Notice I only put water in one basin, the middle one. Also notice I named the basins so I can keep track of them since the screen will rotate when I move around. With this design I plan to send water from the middle basin to the 4 outer basins, then send the water back to the middle basin and repeat, creating a repeating affect. To add water to the basin you will need jugs of water in your inventory, the more water you put in the basin the longer it will take to repeat because it will take longer to move that amount of water. To be honest, I used too much water in the middle basin, but I wanted it to take longer, however most people won't set there and watch the full effect when it takes this long. 50 water will make for a very fast turn around. | |
| − | <BR> | + | <BR><BR> |
{| border="1" cellpadding="5" cellspacing="2" | {| border="1" cellpadding="5" cellspacing="2" | ||
|- | |- | ||
|[[File:Layout.jpg|Layout|600x600px]]<br>Layout || [[File:Mechanism.png|Interface|600x600px]]<br>Interface | |[[File:Layout.jpg|Layout|600x600px]]<br>Layout || [[File:Mechanism.png|Interface|600x600px]]<br>Interface | ||
|} | |} | ||
| − | + | How do we send that water to the other basins? We use nozzles of course. On the [[Test of Dancing Waters]] link you will find all of the nozzles available, If you sort that table by the flow rates, from lowest to highest, use only the nozzles with the lower rates. I suggest you stay away from the Dirty Rain nozzle because it has an extremely high flow rate and it will cause too much stress. Using the lower rate nozzles you will be able to use more nozzles and stay below the maximum stress level.<BR> | |
| − | How do we | + | While putting the nozzles in the basins, I moved them before I hit the build button so they were not all on top of each other. On the <b>Interface</b> image above you can see there are 5 nozzles in the middle basin, 4 White Showers moved to the side and 1 Misty Bubbles in the center. The outer basins contain 2 nozzles in each, a Misty Bubbles in the center and a Crystal Fog moved to the side. You can pick the nozzles up by clicking on them, but you will lose any configuration you have set for them.<BR> |
| − | While putting the nozzles in the basins, I moved them before I hit the build button so they were not all on top of each other. On the <b>Interface</b> image above you can see there are 5 nozzles in the middle basin, 4 White Showers moved to the | + | <b><i>For this tutorial only put in the 4 White Showers in the middle basin because all nozzles will need to be configured in order to start the fountain for testing.</i></b> |
| − | + | <BR><BR> | |
{| border="1" cellpadding="5" cellspacing="2" | {| border="1" cellpadding="5" cellspacing="2" | ||
|- | |- | ||
|[[File:Nozzle1.png|Nozzle Selected|600x600px]]<br>Nozzle Selected || [[File:Nozzle1_config.png|Nozzle Configuration|300x500px]]<BR>Nozzle Configuration | |[[File:Nozzle1.png|Nozzle Selected|600x600px]]<br>Nozzle Selected || [[File:Nozzle1_config.png|Nozzle Configuration|300x500px]]<BR>Nozzle Configuration | ||
|} | |} | ||
| − | |||
To configure and aim the nozzles, you select a nozzle by clicking on one of the dots inside a basin, that will change the interface to look something like the <b>Nozzle Selected</b> image above. Notice the dot turned RED and new options appeared. To aim the nozzle you have to move your avatar to the location you want the nozzle to send water. This can be tricky because you can not click inside a basin to move there. I like to use F8F8 camera and use the arrow keys to move(close chat and set Option/Interface/Other:/Use arrow keys for movement), I also set my emote to walk. That way I can get as close to the middle of a basin as I can.<BR> | To configure and aim the nozzles, you select a nozzle by clicking on one of the dots inside a basin, that will change the interface to look something like the <b>Nozzle Selected</b> image above. Notice the dot turned RED and new options appeared. To aim the nozzle you have to move your avatar to the location you want the nozzle to send water. This can be tricky because you can not click inside a basin to move there. I like to use F8F8 camera and use the arrow keys to move(close chat and set Option/Interface/Other:/Use arrow keys for movement), I also set my emote to walk. That way I can get as close to the middle of a basin as I can.<BR> | ||
Notice the yellow dot on the northwest(NW) basin, that is where I am standing, also notice the small grey dot near me, that is where the nozzle was aimed. To aim the nozzle hit the <b>Aim(Gentle)</b> or the <b>Aim(Abrupt)</b> button. I typically use the Aim(Abrupt) button because that will make the nozzle shot the water to that location quicker. Once an aim button is hit, it will add some attributes to the <b>Time 0</b> line on the nozzle table. With that line selected, you can then raise or lower the water stream by using the <b>Higher</b> or <b>Lower</b> buttons.<BR> | Notice the yellow dot on the northwest(NW) basin, that is where I am standing, also notice the small grey dot near me, that is where the nozzle was aimed. To aim the nozzle hit the <b>Aim(Gentle)</b> or the <b>Aim(Abrupt)</b> button. I typically use the Aim(Abrupt) button because that will make the nozzle shot the water to that location quicker. Once an aim button is hit, it will add some attributes to the <b>Time 0</b> line on the nozzle table. With that line selected, you can then raise or lower the water stream by using the <b>Higher</b> or <b>Lower</b> buttons.<BR> | ||
| − | With this nozzle still selected, hit the <b>Config</b> button to see the configuration screen for this nozzle. On the <b>Nozzle Configuration</b> image above you see there are several options to set. I suggest you name | + | With this nozzle still selected, hit the <b>Config</b> button to see the configuration screen for this nozzle. On the <b>Nozzle Configuration</b> image above you see there are several options to set. I suggest you name your nozzles, it help you keep track of them, however I didn't this time. The <b>Turn-off Level</b> is used to tell the nozzle what water level to get to to turn off, the <b>Turn-on Level</b> tells the nozzle when to turn on. Those are the only two settings you really need to worry about, the rest of the settings I do not change, I really don't see much of a change with them but your welcome to experiment. The two check boxes on the bottom I do set, the <b>Move While Dry</b> I turn off on all nozzles and the <b>Start On</b> I tun on for nozzles in the basin with the starting water and off for nozzles in basins with no water.<BR> |
| − | Since there is 600 water in the starting basin(middle), I set the On Level to 600 and I set the Off Level to 220. Using some math; (600 - 220) = 380 so 380 water will be sent to 4 basins at the same time. (380 / 4) = 95 will make the outer basins have 95 water each. That will also leave 220 water in the middle basin that I will | + | Since there is 600 water in the starting basin(middle), I set the On Level to 600 and I set the Off Level to 220. Using some math; (600 - 220) = 380 so 380 water will be sent to 4 outer basins at the same time. (380 / 4) = 95 will make the outer basins have 95 water each. That will also leave 220 water in the middle basin that I will use for the center nozzles in those basins, but we don't really need that much. Now you need to run/walk to each of the other outer basins and select a different nozzle to aim to those basins and set their configurations. I choose to use the nozzle closest to the outer basin I am aiming for, you may want to use different nozzles to get a different affect. |
| − | + | <BR><BR> | |
| + | [[File:Test1.png|Testing|600x600px]]<BR> | ||
| + | Now let's test this. Hit the <b>Start</b> button and wait for the Synchronizing count down to finish and you will notice some numbers in each basin. This indicates the water levels in the basins. When the water level in the middle basin reaches the Off Level for those nozzles they will stop and you should see something like the <b>Testing</b> image above.<BR> Now hit the <b>Stop</b> button | ||
| + | <BR><BR> | ||
{| border="1" cellpadding="5" cellspacing="2" | {| border="1" cellpadding="5" cellspacing="2" | ||
|- | |- | ||
|[[File:Nozzle2.png|Outer Nozzle Selected|600x600px]]<br>Outer Nozzle Selected || [[File:Nozzle2_config.png|Outer Nozzle Configuration|300x500px]]<BR>Outer Nozzle Configuration | |[[File:Nozzle2.png|Outer Nozzle Selected|600x600px]]<br>Outer Nozzle Selected || [[File:Nozzle2_config.png|Outer Nozzle Configuration|300x500px]]<BR>Outer Nozzle Configuration | ||
|} | |} | ||
| − | + | We will now set the nozzles in the outer basins to send the water back to the middle basin. Only add the 1 Crystal Fog nozzle to each of the outer basins and move them away from center. Then select a nozzle in one of the outer basins as shown on the <b>Outer Nozzle Selected</b> image above and stand in the center of the middle basin. Hit one of the <b>Aim</b> buttons. Also hit the <b>Config</b> button for this nozzle and as the <b>Outer Nozzle Configuration</b> image above shows, we will set the Off Level to 0 because we want to empty them back into the middle basin so its water level will get back to 600 to turn those nozzles back on. We will set the On level to 95 because due to our math we know that is all the water they will get from the middle basin's nozzles, we also confirmed that with the test. We also turn off the <b>Start On?</b> check box. As you can see on the <b>Outer Nozzle Selected</b> image, I changed the <b>Spread</b> of these nozzles. That is done by using the <b>Tighter</b>, <b>Wider</b> and <b>Shorter</b>, <b>Longer</b> buttons. These will effect how the water stream looks, you can experiment with those, but for these nozzles I want you to keep them all the same. Notice the percentage numbers to help you set the others with the same attributes.<BR> | |
| − | We will now set the nozzles in the outer basins to send the water back to the middle basin. | + | Do not move your avatar and set the other outer nozzles in the other basins to aim at the same location and set their configurations the same. |
| − | + | <BR><BR> | |
| − | + | This is a good time to test it again. This time it should continue to repeat and you now have a working fountain.<BR> | |
| − | + | But wait, we are not done yet.<BR> | |
| − | + | <BR> | |
| − | <BR> | + | {| border="1" cellpadding="5" cellspacing="2" |
| − | Do not move your avatar and set the other outer nozzles to aim at the same location and set their configurations the same. | + | |- |
| + | |[[File:Nozzle3.png|Center Nozzle Selected|600x600px]]<br>Center Nozzle Selected || [[File:Nozzle3_config.png|Center Nozzle Configuration|300x500px]]<BR>Center Nozzle Configuration | ||
| + | |} | ||
| + | Now we will play with center nozzle in the middle basin, it will be a Misty Bubbles, go ahead and add it, but do not move it so it will be perfectly centered. Notice the yellow dot(me) on the <b>Center Nozzle Selected</b> image above is as close the the center of the middle basin as I could get and I have the center nozzle selected. I am standing on the nozzle because I want this water stream to go straight up. Hit one of the <b>Aim</b> buttons and notice I set the height to 10 for <b>Time 0</b>. Now click on the <b>Time 1</b> row and hit <b>Aim</b> again and set the height to 30. This will make that water stream start at the first height then go higher on the next Time tick. You can complete the rest of the Time settings and use what ever heights you want. All of these Time setting are aimed at the same location, however if you want that stream to wobble around as it goes up and down you can move over and try to stand on the other nozzle locations before you hit the Aim button. Notice the <b>Center Nozzle Configuration</b> image above, the On and Off levels have no real effect because the Off level is never reached, so this nozzle will stay on all the time. Test it. | ||
| + | <BR><BR> | ||
| + | {| border="1" cellpadding="5" cellspacing="2" | ||
| + | |- | ||
| + | |[[File:Nozzle4.png|Last Nozzles Selected|600x600px]]<br>Last Nozzles Selected || [[File:Nozzle4_config.png|Last Nozzles Configuration|300x500px]]<BR>Last Nozzles Configuration | ||
| + | |} | ||
| + | Now for the final nozzles and we will be done. These nozzles will send water from one outer basin to another. Since these nozzle are sending water from one outer basin to another at the same rate it will not affect the On and Off levels for the nozzles in these basins. On the <b>Last Nozzles Selected</b> image above, you can see I have the center nozzle in the NW basin selected and I am standing in the NE basin. Hit one of the <b>Aim</b> buttons and set the height and Spread attributes. Hit the <b>Config</b> button and set the On Level to 35 and the Off level to 30. This will make these nozzles turn on and off while the nozzles in the middle basin are filling these basins. Move to the next basin and select the nozzle in the basin you were just in and set its attributes. Test it. | ||
| + | <BR><BR> | ||
| + | To Open the fountain for judging you must start it first. I hope this tutorial has helped and good luck on passing this test. | ||
Latest revision as of 21:27, 30 March 2014
Dancing Waters Guide
I will attempt to explain how to configure a moderately complex fountain design since the interface is not very intuitive. The resouces needed to build the components can be found on the Test of Dancing Waters wiki page.
Start by building the Mechanism. It is built in a small construction site, but do not add any material to it until you make the 3 output gearbox. I suggest you look for a gearbox requirement that has two ranges that overlap, that way you can use two of the same outputs, however, to make it even easier do not use one where the different range is in the middle. You can tear down the construction site and get the material back and try again as many times as you need, each time you will get a different gearbox requirement. The construction site will last two hours and if you need more time you can add just 1 debin of 1 item to reset the timer. Do NOT build the mechanism too close to another fountain.
I will not include the building of the basins, that is the easy part, however once the basins are built they can be moved by clicking on them and using the "Slide" option. I suggest you use the F8F8 camera and try to get them about the same distance apart. Try to keep the basins close to your mechanism.
Notice the images below; the left one illustrates the 5 basins and their configuration screens and the right one is the main interface for the fountain design.
The interface is accessed by clicking on the mechanism and using the Adjust the Fountain option. On the interface the grey dot is the mechanism(sorry, you can only see half of it at the top), the yellow dot is you and the larger circles are the basins. The small dots in the basins are nozzles. You can access the basin's configuration screens by clicking on a basin and hitting the Config button. Notice I only put water in one basin, the middle one. Also notice I named the basins so I can keep track of them since the screen will rotate when I move around. With this design I plan to send water from the middle basin to the 4 outer basins, then send the water back to the middle basin and repeat, creating a repeating affect. To add water to the basin you will need jugs of water in your inventory, the more water you put in the basin the longer it will take to repeat because it will take longer to move that amount of water. To be honest, I used too much water in the middle basin, but I wanted it to take longer, however most people won't set there and watch the full effect when it takes this long. 50 water will make for a very fast turn around.
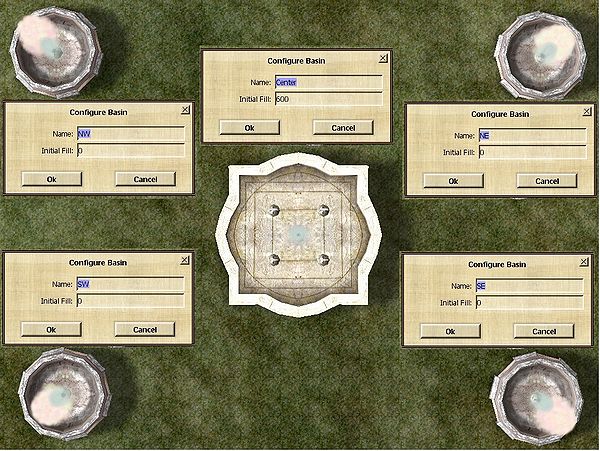 Layout |
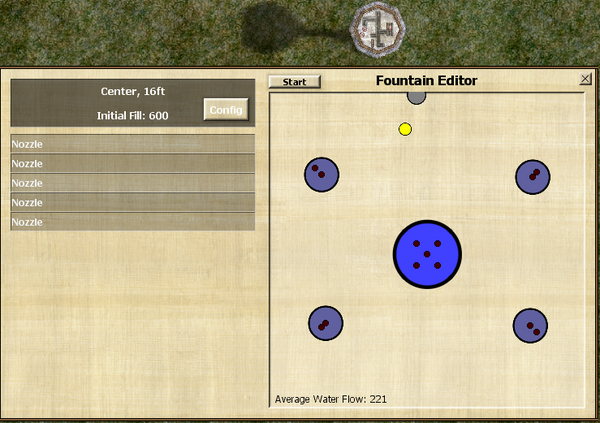 Interface |
How do we send that water to the other basins? We use nozzles of course. On the Test of Dancing Waters link you will find all of the nozzles available, If you sort that table by the flow rates, from lowest to highest, use only the nozzles with the lower rates. I suggest you stay away from the Dirty Rain nozzle because it has an extremely high flow rate and it will cause too much stress. Using the lower rate nozzles you will be able to use more nozzles and stay below the maximum stress level.
While putting the nozzles in the basins, I moved them before I hit the build button so they were not all on top of each other. On the Interface image above you can see there are 5 nozzles in the middle basin, 4 White Showers moved to the side and 1 Misty Bubbles in the center. The outer basins contain 2 nozzles in each, a Misty Bubbles in the center and a Crystal Fog moved to the side. You can pick the nozzles up by clicking on them, but you will lose any configuration you have set for them.
For this tutorial only put in the 4 White Showers in the middle basin because all nozzles will need to be configured in order to start the fountain for testing.
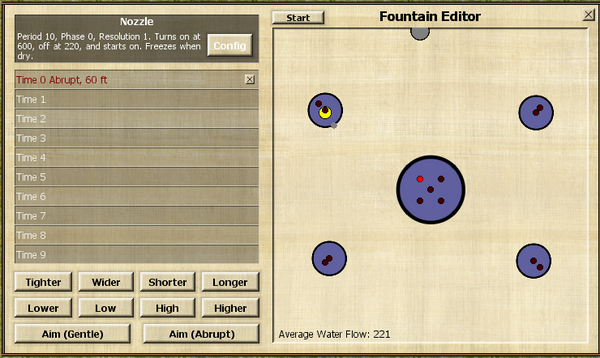 Nozzle Selected |
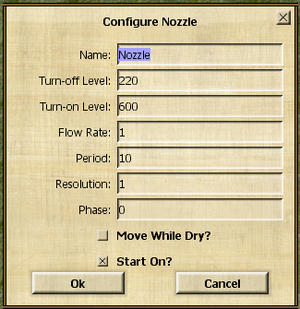 Nozzle Configuration |
To configure and aim the nozzles, you select a nozzle by clicking on one of the dots inside a basin, that will change the interface to look something like the Nozzle Selected image above. Notice the dot turned RED and new options appeared. To aim the nozzle you have to move your avatar to the location you want the nozzle to send water. This can be tricky because you can not click inside a basin to move there. I like to use F8F8 camera and use the arrow keys to move(close chat and set Option/Interface/Other:/Use arrow keys for movement), I also set my emote to walk. That way I can get as close to the middle of a basin as I can.
Notice the yellow dot on the northwest(NW) basin, that is where I am standing, also notice the small grey dot near me, that is where the nozzle was aimed. To aim the nozzle hit the Aim(Gentle) or the Aim(Abrupt) button. I typically use the Aim(Abrupt) button because that will make the nozzle shot the water to that location quicker. Once an aim button is hit, it will add some attributes to the Time 0 line on the nozzle table. With that line selected, you can then raise or lower the water stream by using the Higher or Lower buttons.
With this nozzle still selected, hit the Config button to see the configuration screen for this nozzle. On the Nozzle Configuration image above you see there are several options to set. I suggest you name your nozzles, it help you keep track of them, however I didn't this time. The Turn-off Level is used to tell the nozzle what water level to get to to turn off, the Turn-on Level tells the nozzle when to turn on. Those are the only two settings you really need to worry about, the rest of the settings I do not change, I really don't see much of a change with them but your welcome to experiment. The two check boxes on the bottom I do set, the Move While Dry I turn off on all nozzles and the Start On I tun on for nozzles in the basin with the starting water and off for nozzles in basins with no water.
Since there is 600 water in the starting basin(middle), I set the On Level to 600 and I set the Off Level to 220. Using some math; (600 - 220) = 380 so 380 water will be sent to 4 outer basins at the same time. (380 / 4) = 95 will make the outer basins have 95 water each. That will also leave 220 water in the middle basin that I will use for the center nozzles in those basins, but we don't really need that much. Now you need to run/walk to each of the other outer basins and select a different nozzle to aim to those basins and set their configurations. I choose to use the nozzle closest to the outer basin I am aiming for, you may want to use different nozzles to get a different affect.
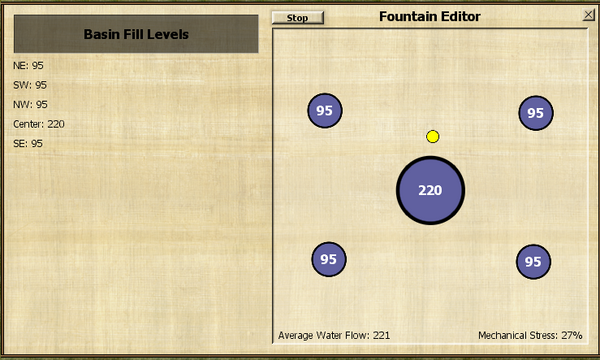
Now let's test this. Hit the Start button and wait for the Synchronizing count down to finish and you will notice some numbers in each basin. This indicates the water levels in the basins. When the water level in the middle basin reaches the Off Level for those nozzles they will stop and you should see something like the Testing image above.
Now hit the Stop button
 Outer Nozzle Selected |
 Outer Nozzle Configuration |
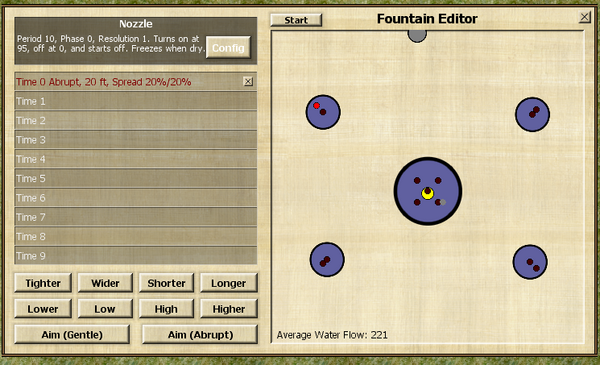
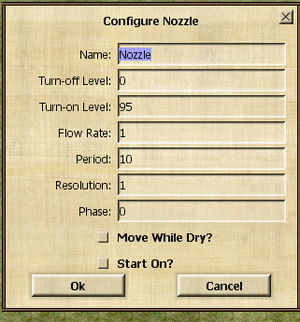
We will now set the nozzles in the outer basins to send the water back to the middle basin. Only add the 1 Crystal Fog nozzle to each of the outer basins and move them away from center. Then select a nozzle in one of the outer basins as shown on the Outer Nozzle Selected image above and stand in the center of the middle basin. Hit one of the Aim buttons. Also hit the Config button for this nozzle and as the Outer Nozzle Configuration image above shows, we will set the Off Level to 0 because we want to empty them back into the middle basin so its water level will get back to 600 to turn those nozzles back on. We will set the On level to 95 because due to our math we know that is all the water they will get from the middle basin's nozzles, we also confirmed that with the test. We also turn off the Start On? check box. As you can see on the Outer Nozzle Selected image, I changed the Spread of these nozzles. That is done by using the Tighter, Wider and Shorter, Longer buttons. These will effect how the water stream looks, you can experiment with those, but for these nozzles I want you to keep them all the same. Notice the percentage numbers to help you set the others with the same attributes.
Do not move your avatar and set the other outer nozzles in the other basins to aim at the same location and set their configurations the same.
This is a good time to test it again. This time it should continue to repeat and you now have a working fountain.
But wait, we are not done yet.
 Center Nozzle Selected |
 Center Nozzle Configuration |
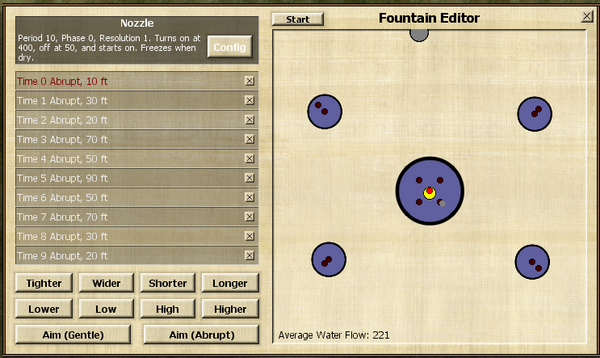
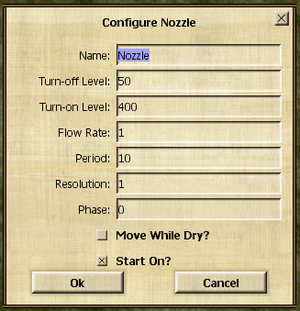
Now we will play with center nozzle in the middle basin, it will be a Misty Bubbles, go ahead and add it, but do not move it so it will be perfectly centered. Notice the yellow dot(me) on the Center Nozzle Selected image above is as close the the center of the middle basin as I could get and I have the center nozzle selected. I am standing on the nozzle because I want this water stream to go straight up. Hit one of the Aim buttons and notice I set the height to 10 for Time 0. Now click on the Time 1 row and hit Aim again and set the height to 30. This will make that water stream start at the first height then go higher on the next Time tick. You can complete the rest of the Time settings and use what ever heights you want. All of these Time setting are aimed at the same location, however if you want that stream to wobble around as it goes up and down you can move over and try to stand on the other nozzle locations before you hit the Aim button. Notice the Center Nozzle Configuration image above, the On and Off levels have no real effect because the Off level is never reached, so this nozzle will stay on all the time. Test it.
 Last Nozzles Selected |
 Last Nozzles Configuration |
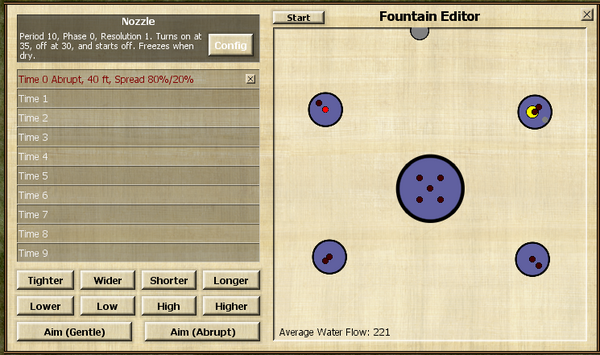
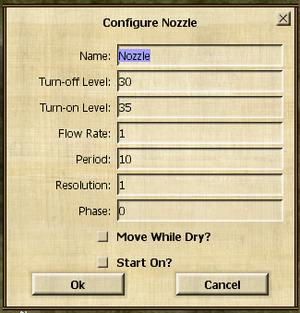
Now for the final nozzles and we will be done. These nozzles will send water from one outer basin to another. Since these nozzle are sending water from one outer basin to another at the same rate it will not affect the On and Off levels for the nozzles in these basins. On the Last Nozzles Selected image above, you can see I have the center nozzle in the NW basin selected and I am standing in the NE basin. Hit one of the Aim buttons and set the height and Spread attributes. Hit the Config button and set the On Level to 35 and the Off level to 30. This will make these nozzles turn on and off while the nozzles in the middle basin are filling these basins. Move to the next basin and select the nozzle in the basin you were just in and set its attributes. Test it.
To Open the fountain for judging you must start it first. I hope this tutorial has helped and good luck on passing this test.