The Wiki for Tale 7 is in read-only mode and is available for archival and reference purposes only. Please visit the current Tale 11 Wiki in the meantime.
If you have any issues with this Wiki, please post in #wiki-editing on Discord or contact Brad in-game.
Difference between revisions of "Guides/River Plains Gem School"
(→Eyelet) |
(→Ring) |
||
| (82 intermediate revisions by 3 users not shown) | |||
| Line 1: | Line 1: | ||
| + | {{Box|Notice on Animations|<center>'''This page is heavy on both network and computing resources.'''</center> | ||
| + | |||
| + | <center>If this is your first time visiting it, please give your browser some time to process it. It will be much faster once all images are cached.</center>}} | ||
| + | |||
__TOC__ | __TOC__ | ||
| − | |||
| − | |||
| + | == About == | ||
| + | |||
| + | Tired of wasting gems practicing cuts you're not very good at yet? At the River Planes Gem School you can come practice your gem cutting skills on any of our many Scholar Tables designed to mimic actual gem cuts. The School is located at [http://goo.gl/LbJNaL 1558,2900] in RP, just north of the chariot stop along the stream. It's the big CP that says GEM across the top. Come visit and never waste another gem again! We look forward to seeing you there. | ||
== Overview == | == Overview == | ||
| Line 10: | Line 15: | ||
In the absence of a specimen case, cut gems that don't match a Gem Catalogue entry must be discarded. | In the absence of a specimen case, cut gems that don't match a Gem Catalogue entry must be discarded. | ||
| + | |||
| + | === Positioning the Camera === | ||
| + | |||
| + | Some players prefer to stand inside the table while cutting. However a good stance to begin with is to the right of Sanding Disk 1, in F6 view. Some players prefer to stand by the pole, with the camera rotated so it is on the rear right of the table. Others prefer the pole on the rear left, so the camera is looking at the face of the gem that will be sliced off by Disc 1. For some cuts you may want to change the camera angle to check on what is going on! | ||
| + | |||
| + | === Using the Axis Controls === | ||
| + | |||
| + | Getting used to the interface will make your gem cutting life easier. It does come with practice. Start by loading a cuttable gem. The option will come up when you click on the gem cutting table with a cuttable gem in your inventory. Pin the menu for reference. | ||
| + | |||
| + | Practice Session 1: | ||
| + | * ROTATE the gem on the Z coordinate first. The + and - signs will switch the rotation direction. Four rotations brings you back to the beginning. | ||
| + | * Now try the Y coordinate. The gem will FLIP towards you (-) or away from you (+) if you are facing Cutting Disk 1 at the front of the table. | ||
| + | * Finally, try using the X axis. The gem will TWIRL either clockwise (+ -check) or anticlockwise (-) around the middle of the front face. | ||
| + | |||
| + | It's easiest to view the table while using the Explorer's Camera (F6) or Builder's Camera (F7). Adjust your distance and viewing angle until it feels comfortable for you. | ||
| + | |||
| + | Eventually you may want cut gems using the hotkeys, but it makes sense to become familiar with the way the cutting blades work first. | ||
| + | |||
| + | === Cutting the Gem === | ||
| + | |||
| + | Each gem is roughly a cube comprised of 7x7x7 smaller cubes (a bit like a Rubric's cube, except bigger). Some of the smaller cubes are empty, and they are 'flaws'. The combinations of flaws and solid gems and the three cutting blades creates an infinity of possible designs. To cut a gem to create a predetermined shape, as listed in the gem catalogue is a definitely a special task requiring a good sense of spatial relationships. The gem catalog will display a sample gem atop the pole on the table, as a reference. | ||
| + | |||
| + | There are three sanding disks. Each disc works in a different plane, and will remove 1 layer of solid gem each time you use it. | ||
| + | |||
| + | Disc 1 works in the vertical axis (90 degrees). Only using Disk 1 will make cubes and rectangular box shapes. | ||
| + | |||
| + | Disc 2 works on the edge to edge diagonal (45 degrees to Disk 1). Using only Disk 2 will make diamond shapes, sometimes with interesting edge patterns. | ||
| + | |||
| + | Disc 3 works on the corner to corner diagonal. (45 degrees to Disk 2) Using Disk 3 also creates diamond shapes, but in a different orientation. | ||
| + | |||
| + | Practice Session 2 | ||
| + | * Use Disk 1 to find and cut a solid square of gem, in any size. | ||
| + | * Use Disk 2 to cut a solid diamond of gem, in any size. | ||
| + | * Use Disk 2 to cut a solid bar 3 segments tall and 1 segment deep and wide. The use Disk 3 to create a pyramid on each end. | ||
| + | Compare to the gem catalogue for "Thistle", and adjust as needed. You have made your first cut gem! | ||
| + | |||
| + | === Making the most of Flaws === | ||
| + | Sculptors sometimes say that they can see the statue hidden within a block of stone, and cut away all the bits that aren't part of the statue. This is sort of what happens with gem cutting. The desired cut gem is hidden within the rough stone. Sand away all the bits that are not what you want. | ||
| + | |||
| + | All cuttable gems have flaws, in an endless array of random configurations. Most types of cut gem can only be formed by taking advantage of flaws in the gem. For example, the "Eyelet" cut requires a flaw two layers deep, surrounded by unflawed gem. The "Full Eye" cut is harder, requiring a three-deep flaw and corresponding surrounding solid gem. | ||
| + | |||
| + | Before starting to cut any gem, examine it carefully to see what can be made from it. It is MUCH more economical to look first to see what is in the gem and take advantage of what you have than waste precious cuttable gems by going for only what you need. The rarest sets of flaws might just come up, giving you a chance at a Dragyn's Eye or Full Aidenn Mask, and those chances are not to be missed! | ||
| + | |||
| + | When you have produced an exact match for a cut gem, rotate the gem so it matches the catalogue example and complete the cut by selecting the type of gem you are making from the "finished cutting" menu of the cutting table. If your gem is an exact match for the sample in the catalogue, it will be removed from the table to your inventory. | ||
| + | |||
| + | Some gem cuts require flaws that are present in only a small fraction of rough gems. Zomboe, an expert gem cutter, has provided an approximate estimate of rarity: Tiki Mask is insanely rare. Others, in approximate order of decreasing rarity, are King's Tomb, Unity, Bridge, Lotus, Ring, Dragyn's Eye, Full Aidenn Mask, Ra's Lantern. If you find a rough gem with the right flaws/ solid characteristics that can be cut into one of these, it's usually best to do it even if you're currently looking for something else - you'll be glad of it later. | ||
== Cut Gem Catalogue == | == Cut Gem Catalogue == | ||
| Line 20: | Line 71: | ||
| | | | ||
|'''Carats''' | |'''Carats''' | ||
| + | |'''Available''' | ||
|'''Instructions''' | |'''Instructions''' | ||
|'''Rarity''' | |'''Rarity''' | ||
| Line 29: | Line 81: | ||
|[[Image:Aidensmask.gif|alt={Aidenn Mask (15 carat)}]] | |[[Image:Aidensmask.gif|alt={Aidenn Mask (15 carat)}]] | ||
|15 | |15 | ||
| + | |Yes | ||
|Two flaws next to each other with solid gem on the outside edge. To cut, use Disk 1 to cut away excess from the front and back of the flaws, then use Disk 2 to cut the angled edges. | |Two flaws next to each other with solid gem on the outside edge. To cut, use Disk 1 to cut away excess from the front and back of the flaws, then use Disk 2 to cut the angled edges. | ||
|Rare | |Rare | ||
| Line 39: | Line 92: | ||
|[[Image:Amanti.gif|alt={Amanti (11 carat)}]] | |[[Image:Amanti.gif|alt={Amanti (11 carat)}]] | ||
|11 | |11 | ||
| − | | | + | |Yes |
| − | |All | + | |Needs 2x2x2 piece of solid gem. Easy way to cut is to make a column of gem 2x2 using Disk 1. The use Disk 2, rotating on z between each cut to form one facetted side, flip over and continue cutting with Disk 2 until complete. |
| + | |Common. All | ||
|1 Cut '''Garnet''': Amanti for [[Test of the Windsong]] | |1 Cut '''Garnet''': Amanti for [[Test of the Windsong]] | ||
1 Cut '''Turquoise''': Amanti for [[Test of the Windsong]] | 1 Cut '''Turquoise''': Amanti for [[Test of the Windsong]] | ||
| Line 51: | Line 105: | ||
|[[Image:Amunet.gif|alt={Amunet}]] | |[[Image:Amunet.gif|alt={Amunet}]] | ||
|46 | |46 | ||
| − | |a | + | |Yes |
| + | |Rare - needs a gem that is mostly solid. Face Disk 1 and use Disk 2 to cut a oblong 2 x 2, making sure that the centre of the long edges are not flawed. A few flaws on either end won't matter too much as you will cut them off in the next phase. Rotate the gem and camera to face Disk 2 and cut twice on all sides to create the point. Flip around to do the other side, checking to make sure that all goes well on the centre 'tab'. | ||
| | | | ||
| | | | ||
| Line 61: | Line 116: | ||
|[[Image:Appolonia.gif|alt={Appolonia (21 carat)}]] | |[[Image:Appolonia.gif|alt={Appolonia (21 carat)}]] | ||
|21 | |21 | ||
| − | | | + | |Yes |
| + | |Using Disk 1, look for a 4 x 4 expanse of solid gem with a single flaw on one edge. Cut to a sheet 1 layer deep, then use Disk 2 to shape the angles around the flaw and to create the pointed bottom. If necessary, use Disk 1 to shape the sides. | ||
|All | |All | ||
|1 Cut '''(Any Gem)''': Appolonia for [[Test of the Windsong]] | |1 Cut '''(Any Gem)''': Appolonia for [[Test of the Windsong]] | ||
| Line 71: | Line 127: | ||
|[[Image:Bastet.gif|alt={Bastet (11 carat)}]] | |[[Image:Bastet.gif|alt={Bastet (11 carat)}]] | ||
|11 | |11 | ||
| − | | | + | |Yes |
| + | |Find a 2 x 1 flaw with a solid are beneath the 'V' of the flaw. Use Disk 1 to cut away to a single layer, then flip and rotate to cut away the sides to form the 'ears' and Disk 2 to make the pointy 'chin'. | ||
|All | |All | ||
| | | | ||
| Line 81: | Line 138: | ||
|[[Image:Bridge.gif|alt={Bridge (14 carat)}]] | |[[Image:Bridge.gif|alt={Bridge (14 carat)}]] | ||
|14 | |14 | ||
| − | |A pair of two-deep vertex flaws directly opposite each other | + | |Yes |
| + | | Rare because of the flaws but easy to cut when they are there! A pair of two-deep vertex flaws directly opposite each other separated with 1 x 1 solid gem. Cut to a single layer using Disk 1 and neaten the edges. | ||
|Ultra-rare | |Ultra-rare | ||
| | | | ||
| Line 91: | Line 149: | ||
|[[Image:Cat's_eye.gif|alt={Cat's Eye (28 carat)}]] | |[[Image:Cat's_eye.gif|alt={Cat's Eye (28 carat)}]] | ||
|28 | |28 | ||
| − | | | + | |Yes |
| + | |Find a two-deep flaw surrounded with solid gem. Trim off excess with Disk 1, then Disk 2 to do the corners. Flip so that the flaw is flat to the table and use Disk 1 to cut the faceted front, rotating on Z between each cut. Reorient to finish. | ||
|Rare | |Rare | ||
| | | | ||
| Line 101: | Line 160: | ||
|[[Image:Choronzon.gif|alt={Choronzon (43 carat)}]] | |[[Image:Choronzon.gif|alt={Choronzon (43 carat)}]] | ||
|43 | |43 | ||
| − | | | + | |Yes |
| + | |Needs a 2 deep x 3 wide x 3 high solid gem. Use Disk 1 to remove shallow flaws. With a flat side facing down use Disk 2 to cut opposing sides, flip and repeat. Stand the gem upright, and use Disk 3 for the corners. Might need Disk 1 to finish off. | ||
|Common | |Common | ||
| | | | ||
| Line 111: | Line 171: | ||
|[[Image:Corner_heart.gif|alt={Corner Heart (4 carat)}]] | |[[Image:Corner_heart.gif|alt={Corner Heart (4 carat)}]] | ||
|4 | |4 | ||
| − | | | + | |Yes |
| + | |Use Disk 3 throughout. Cut to a nice line on top. Rotate on Z twice and cut to the line. Then flip on Y axis twice and cut to one side of the line. Flip on Z twice and keep cutting. The last cut reveals the little dimples and it's done! | ||
|All | |All | ||
| | | | ||
| Line 121: | Line 182: | ||
|[[Image:Crater.gif|alt={Crater}]] | |[[Image:Crater.gif|alt={Crater}]] | ||
|9 | |9 | ||
| − | |A pair of Three-deep flaws intersecting. | + | |Yes |
| + | |A pair of Three-deep flaws intersecting. Cut away excess using Disk 1, then turn the gem over and use Disk 3 to form a point. Finally, use Disk 1 to cut off the point and rotate gem to match the example. | ||
|very rare | |very rare | ||
| | | | ||
| Line 131: | Line 193: | ||
|[[Image:Dalessi.gif|alt={Dalessi (25 carat)}]] | |[[Image:Dalessi.gif|alt={Dalessi (25 carat)}]] | ||
|25 | |25 | ||
| − | | | + | |Yes |
| + | |Start with a 2x2x2 solid square. Doesn't matter if some corners are missing. Rotate so any missing corners are at the top and facing Disk 3. Use Disk 3 to cut one side to the base. Rotate (Z twice) and repeat. Then go one more. Done! | ||
|All | |All | ||
| | | | ||
| Line 141: | Line 204: | ||
|[[Image:Dragyn's_eye.gif|alt={Dragyn's Eye (17 carat)}]] | |[[Image:Dragyn's_eye.gif|alt={Dragyn's Eye (17 carat)}]] | ||
|17 | |17 | ||
| − | |2 | + | |Yes |
| + | |The trick is to find 2 intersecting flaws with solid gem around them. Use Disk 1 to reveal the flaws on an edge and cut off the base. With the corner eyes facing away, use Disk 3 to shave away until you have the final cut. | ||
|Rare | |Rare | ||
| | | | ||
| Line 151: | Line 215: | ||
|[[Image:Eyelet.gif|alt={Eyelet (16 carat)}]] | |[[Image:Eyelet.gif|alt={Eyelet (16 carat)}]] | ||
|16 | |16 | ||
| − | |A | + | |Yes |
| − | |Common | + | |A single flaw that is one layer deep. Find the flaw, then rotate on z axis twice and cut using Disk 1 to expose the other side. Then rotate on y axis and use Disk 1 to cut to a square around the diamond shaped flaw. |
| + | |Common. | ||
| | | | ||
|- | |- | ||
| Line 159: | Line 224: | ||
===='''Full Aidenn Mask'''==== | ===='''Full Aidenn Mask'''==== | ||
| − | |[[Image: | + | |[[Image:Full_aidenn_mask.gif|alt={Full Aiden Mask (21 carat)}]] |
|21 | |21 | ||
| − | | | + | |Yes |
| + | |Look for side by side two deep flaws with a facet missing between them. Use Disk 1 to cut all te way around. Orient the gem with the 'nose' flaw to the top and use Disk 2 on each side to finalise the cut. | ||
|Ultra rare | |Ultra rare | ||
| | | | ||
| Line 167: | Line 233: | ||
<!--/////////////////////////--> | <!--/////////////////////////--> | ||
| | | | ||
| + | |||
===='''Full Eye'''==== | ===='''Full Eye'''==== | ||
| − | |[[Image: | + | |[[Image:Full_eye.gif|alt={Full Eye (24 carat)}]] |
|24 | |24 | ||
| − | | | + | |Yes |
| + | |Look for a two deep single flaw, similar to an eyelet but twice as deep. Use Disk 1 throughout. Rotate the gem so the flaw is at the back and cut until the flaw is revealed. Then cut a square around the flaw, turning as needed. | ||
|Rare | |Rare | ||
| | | | ||
| Line 176: | Line 244: | ||
<!--/////////////////////////--> | <!--/////////////////////////--> | ||
| | | | ||
| + | |||
===='''Hexas Plate'''==== | ===='''Hexas Plate'''==== | ||
| − | |[[Image: | + | |[[Image:Hexas_plate.gif|alt={Hexas Plate (9 carat)}]] |
|9 | |9 | ||
| − | | | + | |Yes |
| + | |Start using Disk 3 to find the 6-sided flaw surrounded with solid gem. Then use a combination of disks to trim around the edges, rotating as needed. Disk 3 will shave the back when the edges are done. A test of skill in spatial relations! | ||
|All | |All | ||
| | | | ||
| Line 185: | Line 255: | ||
<!--/////////////////////////--> | <!--/////////////////////////--> | ||
| | | | ||
| + | |||
===='''Hile's Chevrons'''==== | ===='''Hile's Chevrons'''==== | ||
| − | |[[Image: | + | |[[Image:Hile's_chevrons.gif|alt={Hile's Chevrons (25 carat)}]] |
|25 | |25 | ||
| − | | | + | |Yes |
| + | |Rotate to find a face with mostly 1 deep flaws and use Disk 1 to remove. With the flat face to the front use Disk 3 to cut a 2x3 rectangle, twirling on x axis. When you rotate back around (on z axis), the distinctive facets are revealed. | ||
|All | |All | ||
| | | | ||
| Line 194: | Line 266: | ||
<!--/////////////////////////--> | <!--/////////////////////////--> | ||
| | | | ||
| + | |||
===='''Khufu's Ship'''==== | ===='''Khufu's Ship'''==== | ||
| − | |[[Image: | + | |[[Image:Khufu's_ship.gif|alt={Khufu's Ship (22 carat)}]] |
|22 | |22 | ||
| − | | | + | |Yes |
| + | |Find a shallow 2x1 flaw. Use Disk 1 to cut to the edges and Disk 3 to cut points on both ends. With the flaw at the bottom use Disk 2 to make the keel and Disk 1 to make the blunt end. Rotate the blunt end to face Disk 2 an cut to finalise. Turn it over to see the boat! | ||
|Uncommon | |Uncommon | ||
| | | | ||
| Line 203: | Line 277: | ||
<!--/////////////////////////--> | <!--/////////////////////////--> | ||
| | | | ||
| + | |||
===='''King's Tomb'''==== | ===='''King's Tomb'''==== | ||
| − | |[[Image: | + | |[[Image:King's_tomb.gif|alt={King's Tomb (43 carat)}]] |
|43 | |43 | ||
| − | | | + | |Yes |
| + | |One of the super rare gems to find. Needs single flaw in the centre of a side with solid gem 2 deep all around. Use Disk 1 to reveal the central dimple with solid gem all around it. Use Disk 3 to create the pyramid on the reverse, just like a Queens Tomb, but bigger. | ||
|Ultra rare | |Ultra rare | ||
| | | | ||
| Line 212: | Line 288: | ||
<!--/////////////////////////--> | <!--/////////////////////////--> | ||
| | | | ||
| + | |||
===='''Lens'''==== | ===='''Lens'''==== | ||
| − | |[[Image:Lens. | + | |[[Image:Lens.gif|alt={Lens (12 carat)}]] |
|12 | |12 | ||
| − | | | + | |Yes |
| − | |All | + | |Use Disk 1 to cut a single layer of gem, looking for a 2 x 2 area of solid gem. Use Disk 2 to cut one edge of the diamond, then rotate progressively on x axis to shape the other 3 sides. |
| + | |Common. All | ||
| | | | ||
|- style="background-color:#fff8e7;" | |- style="background-color:#fff8e7;" | ||
<!--/////////////////////////--> | <!--/////////////////////////--> | ||
| | | | ||
| + | |||
===='''Looking Glass'''==== | ===='''Looking Glass'''==== | ||
| − | |[[Image: | + | |[[Image:Looking_glass.gif|alt={Looking Glass (24 carat)}]] |
|24 | |24 | ||
| − | | | + | |Yes |
| + | |Use Disk 1 to reveal a large area of unflawed gem. Flip on z twice and cut to a single thickness of gem. Continue with Disk 1 to cut to the final dimensions. | ||
|Common | |Common | ||
| | | | ||
| Line 230: | Line 310: | ||
<!--/////////////////////////--> | <!--/////////////////////////--> | ||
| | | | ||
| + | |||
===='''Lotus'''==== | ===='''Lotus'''==== | ||
| − | |[[Image:Lotus. | + | |[[Image:Lotus.gif|alt={Lotus (19 carat)}]] |
|19 | |19 | ||
| − | | | + | |Yes |
| − | |Ultra rare | + | |Needs tow intersecting 2x1x1 flaws with solid on one side. Use Disk 1 to reveal the facetted centre and to cut around all 4 sides. Flip the column over and use Disk 3 to shape the four sides of the pointed side. Flip back over when complete. |
| + | |Ultra rare. | ||
| | | | ||
|- style="background-color:#fff8e7;" | |- style="background-color:#fff8e7;" | ||
<!--/////////////////////////--> | <!--/////////////////////////--> | ||
| | | | ||
| + | |||
===='''Moorish Arch'''==== | ===='''Moorish Arch'''==== | ||
| − | |[[Image: | + | |[[Image:Moorish_arch.gif|alt={Moorish Arch}]] |
|15 | |15 | ||
| + | |Yes | ||
| + | |Not as difficult as it looks. Find a two deep flaw near the centre of the gem, with solid on two sides (similar to a Full Eye). With the flaw facing Disk 2, use Disk 2 to slice to the edge of the flaw, then one more. Flip over and repeat. This creates the panel oriented on the diagonal. Rotate so the arch is upright and use disk 2 and then disk 3 to shape the top features of the arch to finish. | ||
| | | | ||
| | | | ||
| Line 248: | Line 333: | ||
<!--/////////////////////////--> | <!--/////////////////////////--> | ||
| | | | ||
| + | |||
===='''Osiris Eye'''==== | ===='''Osiris Eye'''==== | ||
|[[Image:Osiris_eye.gif|alt={Osiris Eye}]] | |[[Image:Osiris_eye.gif|alt={Osiris Eye}]] | ||
|10 | |10 | ||
| + | |Yes | ||
|Description: A long 3 width flaw with a 2-deep flaw in the middle. To cut, use Disk 1 to remove the excess gem from both long sides. Flip so the 'eye' is at the bottom and pointing towards the front of the table. Use Disk 2 to create a peak and reveal the central eye. Turn back around and position to use Disk 3 to cut the points at the top and bottom. | |Description: A long 3 width flaw with a 2-deep flaw in the middle. To cut, use Disk 1 to remove the excess gem from both long sides. Flip so the 'eye' is at the bottom and pointing towards the front of the table. Use Disk 2 to create a peak and reveal the central eye. Turn back around and position to use Disk 3 to cut the points at the top and bottom. | ||
| | | | ||
| Line 259: | Line 346: | ||
===='''Prism'''==== | ===='''Prism'''==== | ||
| − | |[[Image:Prism. | + | |[[Image:Prism.gif|alt={Prism}]] |
| − | |||
| − | |||
| | | | ||
| + | |Yes | ||
| + | |Cut a 2 x 2 x 2 square of solid gem using Disk 1. Then switch to Disk 2 and cut to the base of the gem. Reorient to match the example. | ||
| + | |Common | ||
| | | | ||
|- | |- | ||
<!--/////////////////////////--> | <!--/////////////////////////--> | ||
| | | | ||
| + | |||
===='''Queen's Tomb'''==== | ===='''Queen's Tomb'''==== | ||
| − | |[[Image: | + | |[[Image:Queen's_tomb.gif|alt={Queen's Tomb (18 carat)}]] |
|18 | |18 | ||
| + | |Yes | ||
|Single flaw surrounded by a ring of unflawed gem | |Single flaw surrounded by a ring of unflawed gem | ||
|Common | |Common | ||
| Line 276: | Line 366: | ||
<!--/////////////////////////--> | <!--/////////////////////////--> | ||
| | | | ||
| + | |||
===='''Ra's Lantern'''==== | ===='''Ra's Lantern'''==== | ||
| − | |[[Image: | + | |[[Image:Ra's_lantern.gif|alt={Ra's Lantern (27 carat)}]] |
|27 | |27 | ||
| + | |Yes | ||
|Double-width vertex flaw, with one flaw two-deep, with unflawed gem on remaining three sides of prism | |Double-width vertex flaw, with one flaw two-deep, with unflawed gem on remaining three sides of prism | ||
|Ultra rare | |Ultra rare | ||
| Line 285: | Line 377: | ||
<!--/////////////////////////--> | <!--/////////////////////////--> | ||
| | | | ||
| + | |||
===='''Reflection'''==== | ===='''Reflection'''==== | ||
| − | |[[Image:Reflection. | + | |[[Image:Reflection.gif|alt={Reflection (14 carat)}]] |
|14 | |14 | ||
| + | |Yes | ||
|Two two-deep vertex flaws next to each other, points touching | |Two two-deep vertex flaws next to each other, points touching | ||
|Rare | |Rare | ||
| Line 294: | Line 388: | ||
<!--/////////////////////////--> | <!--/////////////////////////--> | ||
| | | | ||
| + | |||
===='''Refractor'''==== | ===='''Refractor'''==== | ||
| − | |[[Image: | + | |[[Image:Refreactor.gif|alt={Refractor}]] |
| − | |||
| | | | ||
| + | |Yes | ||
| + | |Using Disk 3 reveal unflawed solid gem. Rotate once on Z and cut to a nice clean edge. Flip and rotate so the edge is opposite Disk 2 in the same alignment and cut the prism shape. Use disk 1 to trim the ends to the desired length. | ||
| | | | ||
| | | | ||
| Line 303: | Line 399: | ||
<!--/////////////////////////--> | <!--/////////////////////////--> | ||
| | | | ||
| + | |||
===='''Ring'''==== | ===='''Ring'''==== | ||
| − | |[[Image:Ring. | + | |[[Image:Ring.gif|alt={Ring (13 carat)}]] |
|13 | |13 | ||
| − | | | + | |Yes |
| + | |Look for a 'T' shaped flaw. With Disk 1 carefully cut to shape, keeping solid edges around the stem of the 'T'. Use Disk 2 around the 'stem' flaw to make the top of the ring. Flip over and use Disk 3 to cut to the base on all four sides. | ||
|Ultra rare | |Ultra rare | ||
| | | | ||
| Line 314: | Line 412: | ||
===='''Shen of Horus'''==== | ===='''Shen of Horus'''==== | ||
| − | |[[Image: | + | |[[Image:Shen_of_horus.gif|alt={Shen of Horus}]] |
|28 | |28 | ||
| + | |No | ||
|two adjacent 3-deep flaws, surrounded by unflawed gem | |two adjacent 3-deep flaws, surrounded by unflawed gem | ||
|crazy | |crazy | ||
| Line 322: | Line 421: | ||
<!--/////////////////////////--> | <!--/////////////////////////--> | ||
| | | | ||
| + | |||
===='''Solarkin'''==== | ===='''Solarkin'''==== | ||
| − | |[[Image:Solarkin. | + | |[[Image:Solarkin.gif|alt={Solarkin}]] |
|24 | |24 | ||
| − | | | + | |No |
| + | |Find the flaw combination and the battle is almost over. Carve away all sides with Disk 3 to create the outline. With the key flaws down and the top facing Disk 2 cut to form the base. Turn on Z twice and shape the top. | ||
| | | | ||
| | | | ||
| Line 331: | Line 432: | ||
<!--/////////////////////////--> | <!--/////////////////////////--> | ||
| | | | ||
| + | |||
===='''Sprocket'''==== | ===='''Sprocket'''==== | ||
| − | |[[Image:Sprocket. | + | |[[Image:Sprocket.gif|alt={Sprocket (14 carat)}]] |
|14 | |14 | ||
| − | | | + | |Yes |
| + | |Needs a relatively unflawed diagonal plane. Position a large corner triangle opposite Disk 3, and cut to 3 deep. Cut a three sided shape using Disk 2, twirling on -X once and -Z three times to reposition. Flip over to work the same way on the other side, cutting to the edge of the first facet on the first face. Not as hard as it looks. | ||
|All | |All | ||
| | | | ||
| Line 340: | Line 443: | ||
<!--/////////////////////////--> | <!--/////////////////////////--> | ||
| | | | ||
| + | |||
===='''Suspension'''==== | ===='''Suspension'''==== | ||
| − | |[[Image:Suspension. | + | |[[Image:Suspension.gif|alt={Suspension}]] |
|9 | |9 | ||
| − | | | + | |Yes |
| + | |Very like a Corner Heart to cut, except bigger and with the gap on the bottom. Find an 'eyelet' flaw (not on an edge) with solid on opposing sides. Turn the gem so the flaw is facing Disk 3 and cut to the centre of the flaw. Rotate on x twice and repeat. This will form the gap at the bottom of the cut between the two pointy legs. Rotate on Y to sit the gem on its legs and rotate on Z and use Disk 3 to shave away to form the distinctive shape. The 'dimples' will appear on the final cut. | ||
| | | | ||
| | | | ||
| Line 349: | Line 454: | ||
<!--/////////////////////////--> | <!--/////////////////////////--> | ||
| | | | ||
| + | |||
===='''Symmetry'''==== | ===='''Symmetry'''==== | ||
| − | |[[Image:Symmetry. | + | |[[Image:Symmetry.gif|alt={Symmetry (19 carat)}]] |
|19 | |19 | ||
| − | | | + | |Yes |
| + | |Cut a 2x2x2 square of solid gem using Disk 1. Then use Disk 3 to shave off each corner. | ||
|All | |All | ||
| | | | ||
| Line 358: | Line 465: | ||
<!--/////////////////////////--> | <!--/////////////////////////--> | ||
| | | | ||
| + | |||
| + | ===='''The Fox'''==== | ||
| + | |[[Image:The_fox.gif]] | ||
| + | |? | ||
| + | |No | ||
| + | | | ||
| + | | | ||
| + | | | ||
| + | |- style="background-color:#fff8e7;" | ||
| + | <!--/////////////////////////--> | ||
| + | | | ||
| + | |||
===='''The Shark'''==== | ===='''The Shark'''==== | ||
| − | |[[Image: | + | |[[Image:The_shark.gif]] |
|8 | |8 | ||
| − | | | + | |Yes |
| + | |Find and cut a Full Eye, then use Disk 3 to take away opposing corners. | ||
|Rare | |Rare | ||
| | | | ||
| Line 367: | Line 487: | ||
<!--/////////////////////////--> | <!--/////////////////////////--> | ||
| | | | ||
| + | |||
===='''Thistle'''==== | ===='''Thistle'''==== | ||
| − | |[[Image:Thistle. | + | |[[Image:Thistle.gif|alt={Thistle (12 carat)}]] |
|12 | |12 | ||
| − | | | + | |Yes |
| + | |One way to cut this is to use Disk 2 to make a long diamond shaped oblong. Turn it upright (y axis) and use Disk 3 to form one pointy end, rotating on z as you go. Then flip over and repeat on the other side until you complete the cut. | ||
|All | |All | ||
| | | | ||
| Line 376: | Line 498: | ||
<!--/////////////////////////--> | <!--/////////////////////////--> | ||
| | | | ||
| + | |||
===='''Thoth's Knot'''==== | ===='''Thoth's Knot'''==== | ||
| − | |[[Image: | + | |[[Image:Thoth's_knot.gif|alt={Thoth's Knot (18 carat)}]] |
|18 | |18 | ||
| + | |No | ||
|Two lines of three flaws, crossing adjacent to one another, with solid gem beside each and 1 cell of gem above and below | |Two lines of three flaws, crossing adjacent to one another, with solid gem beside each and 1 cell of gem above and below | ||
|Ultra rare | |Ultra rare | ||
| Line 385: | Line 509: | ||
<!--/////////////////////////--> | <!--/////////////////////////--> | ||
| | | | ||
| + | |||
===='''Tiki Mask'''==== | ===='''Tiki Mask'''==== | ||
| − | |[[Image: | + | |[[Image:Tiki_mask.gif|alt={Tiki Mask (35 carat)}]] |
|35 | |35 | ||
| + | |No | ||
|Double-width one-deep vertex flaw | |Double-width one-deep vertex flaw | ||
|Ultra rare | |Ultra rare | ||
| Line 394: | Line 520: | ||
<!--/////////////////////////--> | <!--/////////////////////////--> | ||
| | | | ||
| + | |||
===='''Tombstone'''==== | ===='''Tombstone'''==== | ||
| − | |[[Image:Tombstone. | + | |[[Image:Tombstone.gif|alt={Tombstone}]] |
|26 | |26 | ||
| + | |No | ||
| | | | ||
| | | | ||
| Line 403: | Line 531: | ||
<!--/////////////////////////--> | <!--/////////////////////////--> | ||
| | | | ||
| + | |||
===='''Triclops'''==== | ===='''Triclops'''==== | ||
| − | |[[Image:Triclops. | + | |[[Image:Triclops.gif|alt={Triclops}]] |
|14 | |14 | ||
| − | | | + | |Yes |
| − | | | + | |Easy to cut once you spot the three single flaws in a row. Use Disk 1 to cut to a single layer, the remove the excess to the top and bottom of the row. Finally, use Disk 2 to neaten the edges. |
| + | |Rare | ||
| | | | ||
|- | |- | ||
<!--/////////////////////////--> | <!--/////////////////////////--> | ||
| | | | ||
| + | |||
===='''Unity'''==== | ===='''Unity'''==== | ||
| − | |[[Image: | + | |[[Image:Unity.gif|alt={Unity (36 carat)}]] |
|36 | |36 | ||
| + | |Yes | ||
|Two-deep vertex flaw surrounded by an area of unflawed gem. The trick is to find the configuration of flaw and unflawed gem. To cut, look for a Full Eye surrounded by solid gem, and use Cutting Disk 2 to create the distinctive frame around the central flaw. | |Two-deep vertex flaw surrounded by an area of unflawed gem. The trick is to find the configuration of flaw and unflawed gem. To cut, look for a Full Eye surrounded by solid gem, and use Cutting Disk 2 to create the distinctive frame around the central flaw. | ||
|Ultra rare | |Ultra rare | ||
Latest revision as of 10:39, 1 October 2016
|
|||||
About
Tired of wasting gems practicing cuts you're not very good at yet? At the River Planes Gem School you can come practice your gem cutting skills on any of our many Scholar Tables designed to mimic actual gem cuts. The School is located at 1558,2900 in RP, just north of the chariot stop along the stream. It's the big CP that says GEM across the top. Come visit and never waste another gem again! We look forward to seeing you there.
Overview
Sections of Cuttable Gems are sliced away on a Gem Cutting Table until the result matches a target design in the Gem Catalogue. At that point, the cut gem may be removed into your inventory.
Nonstandard shapes may be saved in a Specimen Case (available with some multi-month pre-paid packages). Each case holds one cut gem. The contents of the specimen case may later be loaded onto a table for additional cutting.
In the absence of a specimen case, cut gems that don't match a Gem Catalogue entry must be discarded.
Positioning the Camera
Some players prefer to stand inside the table while cutting. However a good stance to begin with is to the right of Sanding Disk 1, in F6 view. Some players prefer to stand by the pole, with the camera rotated so it is on the rear right of the table. Others prefer the pole on the rear left, so the camera is looking at the face of the gem that will be sliced off by Disc 1. For some cuts you may want to change the camera angle to check on what is going on!
Using the Axis Controls
Getting used to the interface will make your gem cutting life easier. It does come with practice. Start by loading a cuttable gem. The option will come up when you click on the gem cutting table with a cuttable gem in your inventory. Pin the menu for reference.
Practice Session 1:
* ROTATE the gem on the Z coordinate first. The + and - signs will switch the rotation direction. Four rotations brings you back to the beginning.
* Now try the Y coordinate. The gem will FLIP towards you (-) or away from you (+) if you are facing Cutting Disk 1 at the front of the table.
* Finally, try using the X axis. The gem will TWIRL either clockwise (+ -check) or anticlockwise (-) around the middle of the front face.
It's easiest to view the table while using the Explorer's Camera (F6) or Builder's Camera (F7). Adjust your distance and viewing angle until it feels comfortable for you.
Eventually you may want cut gems using the hotkeys, but it makes sense to become familiar with the way the cutting blades work first.
Cutting the Gem
Each gem is roughly a cube comprised of 7x7x7 smaller cubes (a bit like a Rubric's cube, except bigger). Some of the smaller cubes are empty, and they are 'flaws'. The combinations of flaws and solid gems and the three cutting blades creates an infinity of possible designs. To cut a gem to create a predetermined shape, as listed in the gem catalogue is a definitely a special task requiring a good sense of spatial relationships. The gem catalog will display a sample gem atop the pole on the table, as a reference.
There are three sanding disks. Each disc works in a different plane, and will remove 1 layer of solid gem each time you use it.
Disc 1 works in the vertical axis (90 degrees). Only using Disk 1 will make cubes and rectangular box shapes.
Disc 2 works on the edge to edge diagonal (45 degrees to Disk 1). Using only Disk 2 will make diamond shapes, sometimes with interesting edge patterns.
Disc 3 works on the corner to corner diagonal. (45 degrees to Disk 2) Using Disk 3 also creates diamond shapes, but in a different orientation.
Practice Session 2
* Use Disk 1 to find and cut a solid square of gem, in any size.
* Use Disk 2 to cut a solid diamond of gem, in any size.
* Use Disk 2 to cut a solid bar 3 segments tall and 1 segment deep and wide. The use Disk 3 to create a pyramid on each end.
  Compare to the gem catalogue for "Thistle", and adjust as needed. You have made your first cut gem!
Making the most of Flaws
Sculptors sometimes say that they can see the statue hidden within a block of stone, and cut away all the bits that aren't part of the statue. This is sort of what happens with gem cutting. The desired cut gem is hidden within the rough stone. Sand away all the bits that are not what you want.
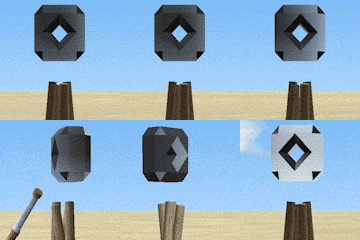
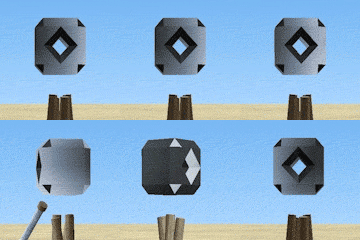
All cuttable gems have flaws, in an endless array of random configurations. Most types of cut gem can only be formed by taking advantage of flaws in the gem. For example, the "Eyelet" cut requires a flaw two layers deep, surrounded by unflawed gem. The "Full Eye" cut is harder, requiring a three-deep flaw and corresponding surrounding solid gem.
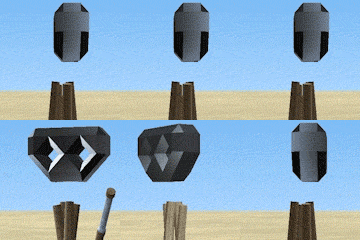
Before starting to cut any gem, examine it carefully to see what can be made from it. It is MUCH more economical to look first to see what is in the gem and take advantage of what you have than waste precious cuttable gems by going for only what you need. The rarest sets of flaws might just come up, giving you a chance at a Dragyn's Eye or Full Aidenn Mask, and those chances are not to be missed!
When you have produced an exact match for a cut gem, rotate the gem so it matches the catalogue example and complete the cut by selecting the type of gem you are making from the "finished cutting" menu of the cutting table. If your gem is an exact match for the sample in the catalogue, it will be removed from the table to your inventory.
Some gem cuts require flaws that are present in only a small fraction of rough gems. Zomboe, an expert gem cutter, has provided an approximate estimate of rarity: Tiki Mask is insanely rare. Others, in approximate order of decreasing rarity, are King's Tomb, Unity, Bridge, Lotus, Ring, Dragyn's Eye, Full Aidenn Mask, Ra's Lantern. If you find a rough gem with the right flaws/ solid characteristics that can be cut into one of these, it's usually best to do it even if you're currently looking for something else - you'll be glad of it later.
Cut Gem Catalogue
Feel free to replace pictures with better ones (preferably 120x120).
| Cut Gem | Carats | Available | Instructions | Rarity | Uses | ||
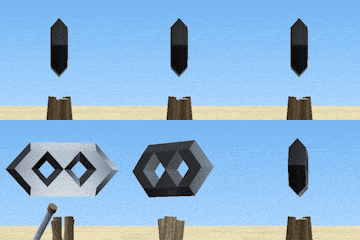
Aidenn Mask |
|
15 | Yes | Two flaws next to each other with solid gem on the outside edge. To cut, use Disk 1 to cut away excess from the front and back of the flaws, then use Disk 2 to cut the angled edges. | Rare | ||
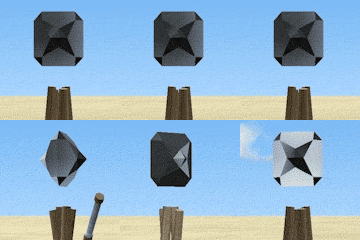
Amanti |
|
11 | Yes | Needs 2x2x2 piece of solid gem. Easy way to cut is to make a column of gem 2x2 using Disk 1. The use Disk 2, rotating on z between each cut to form one facetted side, flip over and continue cutting with Disk 2 until complete. | Common. All | 1 Cut Garnet: Amanti for Test of the Windsong
1 Cut Turquoise: Amanti for Test of the Windsong <Varying Amounts> Garnet: Amanti for Test of the Covered Cartouche | |
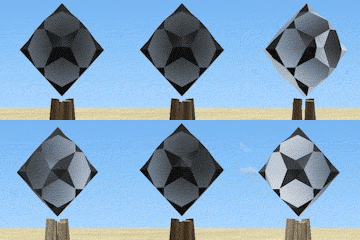
Amunet |
|
46 | Yes | Rare - needs a gem that is mostly solid. Face Disk 1 and use Disk 2 to cut a oblong 2 x 2, making sure that the centre of the long edges are not flawed. A few flaws on either end won't matter too much as you will cut them off in the next phase. Rotate the gem and camera to face Disk 2 and cut twice on all sides to create the point. Flip around to do the other side, checking to make sure that all goes well on the centre 'tab'. | |||
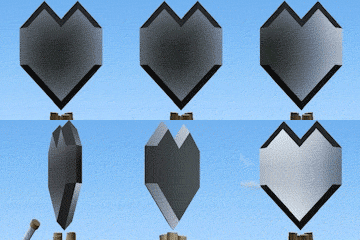
Appolonia |
|
21 | Yes | Using Disk 1, look for a 4 x 4 expanse of solid gem with a single flaw on one edge. Cut to a sheet 1 layer deep, then use Disk 2 to shape the angles around the flaw and to create the pointed bottom. If necessary, use Disk 1 to shape the sides. | All | 1 Cut (Any Gem): Appolonia for Test of the Windsong | |
Bastet |
|
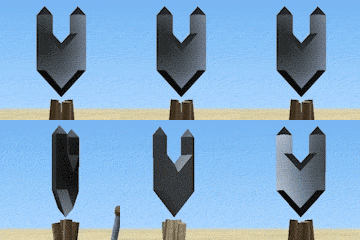
11 | Yes | Find a 2 x 1 flaw with a solid are beneath the 'V' of the flaw. Use Disk 1 to cut away to a single layer, then flip and rotate to cut away the sides to form the 'ears' and Disk 2 to make the pointy 'chin'. | All | ||
Bridge |
|
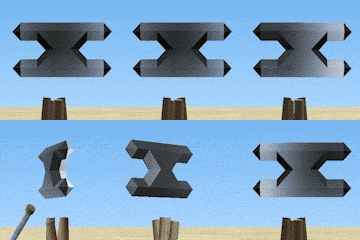
14 | Yes | Rare because of the flaws but easy to cut when they are there! A pair of two-deep vertex flaws directly opposite each other separated with 1 x 1 solid gem. Cut to a single layer using Disk 1 and neaten the edges. | Ultra-rare | ||
Cat's Eye |
|
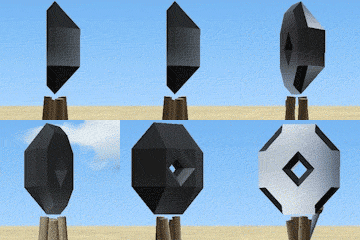
28 | Yes | Find a two-deep flaw surrounded with solid gem. Trim off excess with Disk 1, then Disk 2 to do the corners. Flip so that the flaw is flat to the table and use Disk 1 to cut the faceted front, rotating on Z between each cut. Reorient to finish. | Rare | ||
Choronzon |
|
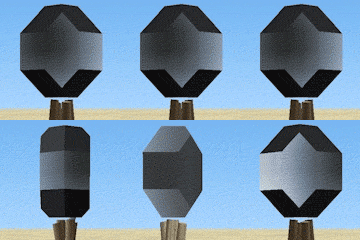
43 | Yes | Needs a 2 deep x 3 wide x 3 high solid gem. Use Disk 1 to remove shallow flaws. With a flat side facing down use Disk 2 to cut opposing sides, flip and repeat. Stand the gem upright, and use Disk 3 for the corners. Might need Disk 1 to finish off. | Common | ||
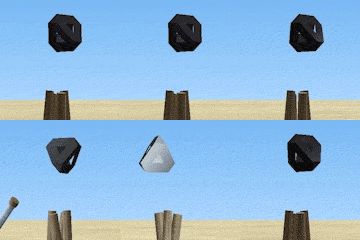
Corner Heart |
|
4 | Yes | Use Disk 3 throughout. Cut to a nice line on top. Rotate on Z twice and cut to the line. Then flip on Y axis twice and cut to one side of the line. Flip on Z twice and keep cutting. The last cut reveals the little dimples and it's done! | All | ||
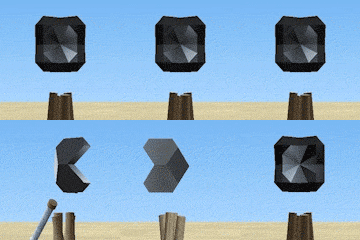
Crater |
|
9 | Yes | A pair of Three-deep flaws intersecting. Cut away excess using Disk 1, then turn the gem over and use Disk 3 to form a point. Finally, use Disk 1 to cut off the point and rotate gem to match the example. | very rare | ||
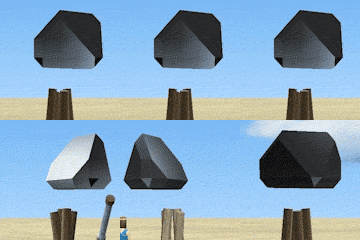
Dalessi |
|
25 | Yes | Start with a 2x2x2 solid square. Doesn't matter if some corners are missing. Rotate so any missing corners are at the top and facing Disk 3. Use Disk 3 to cut one side to the base. Rotate (Z twice) and repeat. Then go one more. Done! | All | ||
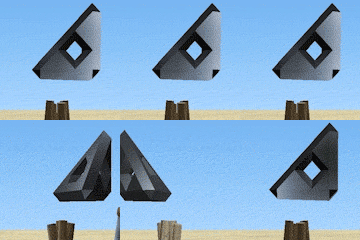
Dragyn's Eye |
|
17 | Yes | The trick is to find 2 intersecting flaws with solid gem around them. Use Disk 1 to reveal the flaws on an edge and cut off the base. With the corner eyes facing away, use Disk 3 to shave away until you have the final cut. | Rare | ||
Eyelet |
|
16 | Yes | A single flaw that is one layer deep. Find the flaw, then rotate on z axis twice and cut using Disk 1 to expose the other side. Then rotate on y axis and use Disk 1 to cut to a square around the diamond shaped flaw. | Common. | ||
Full Aidenn Mask |
|
21 | Yes | Look for side by side two deep flaws with a facet missing between them. Use Disk 1 to cut all te way around. Orient the gem with the 'nose' flaw to the top and use Disk 2 on each side to finalise the cut. | Ultra rare | ||
Full Eye |
|
24 | Yes | Look for a two deep single flaw, similar to an eyelet but twice as deep. Use Disk 1 throughout. Rotate the gem so the flaw is at the back and cut until the flaw is revealed. Then cut a square around the flaw, turning as needed. | Rare | ||
Hexas Plate |
|
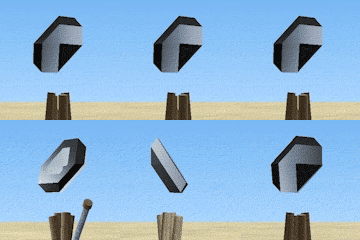
9 | Yes | Start using Disk 3 to find the 6-sided flaw surrounded with solid gem. Then use a combination of disks to trim around the edges, rotating as needed. Disk 3 will shave the back when the edges are done. A test of skill in spatial relations! | All | ||
Hile's Chevrons |
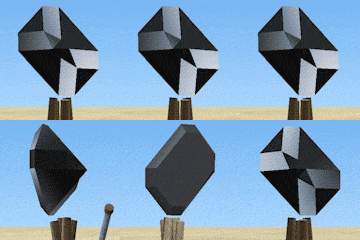
|
25 | Yes | Rotate to find a face with mostly 1 deep flaws and use Disk 1 to remove. With the flat face to the front use Disk 3 to cut a 2x3 rectangle, twirling on x axis. When you rotate back around (on z axis), the distinctive facets are revealed. | All | ||
Khufu's Ship |
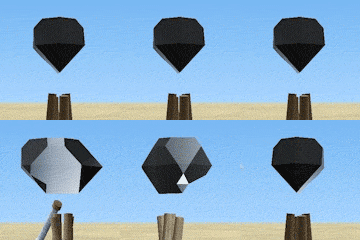
|
22 | Yes | Find a shallow 2x1 flaw. Use Disk 1 to cut to the edges and Disk 3 to cut points on both ends. With the flaw at the bottom use Disk 2 to make the keel and Disk 1 to make the blunt end. Rotate the blunt end to face Disk 2 an cut to finalise. Turn it over to see the boat! | Uncommon | ||
King's Tomb |
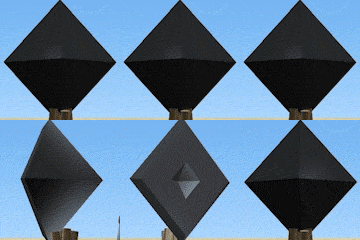
|
43 | Yes | One of the super rare gems to find. Needs single flaw in the centre of a side with solid gem 2 deep all around. Use Disk 1 to reveal the central dimple with solid gem all around it. Use Disk 3 to create the pyramid on the reverse, just like a Queens Tomb, but bigger. | Ultra rare | ||
Lens |
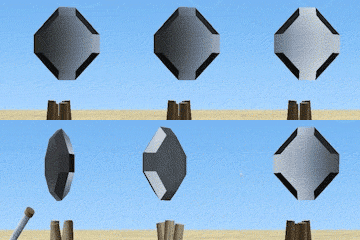
|
12 | Yes | Use Disk 1 to cut a single layer of gem, looking for a 2 x 2 area of solid gem. Use Disk 2 to cut one edge of the diamond, then rotate progressively on x axis to shape the other 3 sides. | Common. All | ||
Looking Glass |
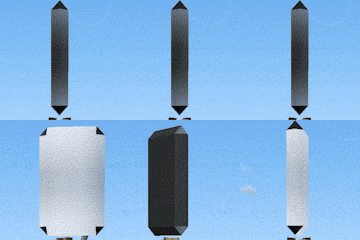
|
24 | Yes | Use Disk 1 to reveal a large area of unflawed gem. Flip on z twice and cut to a single thickness of gem. Continue with Disk 1 to cut to the final dimensions. | Common | ||
Lotus |
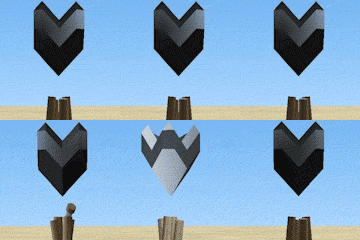
|
19 | Yes | Needs tow intersecting 2x1x1 flaws with solid on one side. Use Disk 1 to reveal the facetted centre and to cut around all 4 sides. Flip the column over and use Disk 3 to shape the four sides of the pointed side. Flip back over when complete. | Ultra rare. | ||
Moorish Arch |
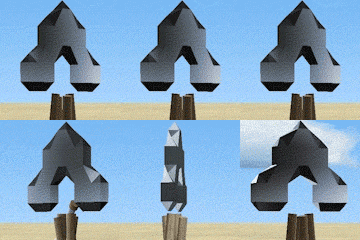
|
15 | Yes | Not as difficult as it looks. Find a two deep flaw near the centre of the gem, with solid on two sides (similar to a Full Eye). With the flaw facing Disk 2, use Disk 2 to slice to the edge of the flaw, then one more. Flip over and repeat. This creates the panel oriented on the diagonal. Rotate so the arch is upright and use disk 2 and then disk 3 to shape the top features of the arch to finish. | |||
Osiris Eye |
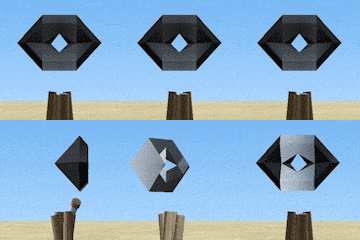
|
10 | Yes | Description: A long 3 width flaw with a 2-deep flaw in the middle. To cut, use Disk 1 to remove the excess gem from both long sides. Flip so the 'eye' is at the bottom and pointing towards the front of the table. Use Disk 2 to create a peak and reveal the central eye. Turn back around and position to use Disk 3 to cut the points at the top and bottom. | |||
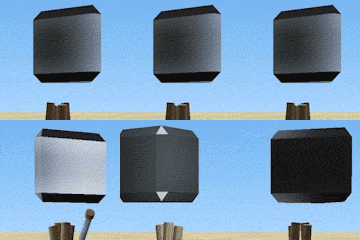
Prism |
|
Yes | Cut a 2 x 2 x 2 square of solid gem using Disk 1. Then switch to Disk 2 and cut to the base of the gem. Reorient to match the example. | Common | |||
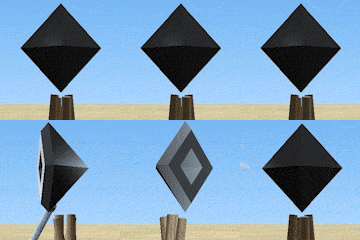
Queen's Tomb |
|
18 | Yes | Single flaw surrounded by a ring of unflawed gem | Common | ||
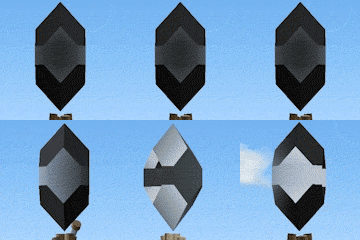
Ra's Lantern |
|
27 | Yes | Double-width vertex flaw, with one flaw two-deep, with unflawed gem on remaining three sides of prism | Ultra rare | ||
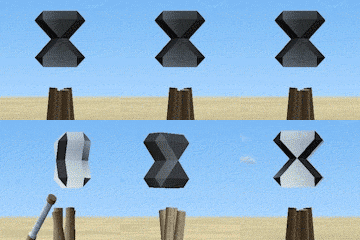
Reflection |
|
14 | Yes | Two two-deep vertex flaws next to each other, points touching | Rare | ||
Refractor |
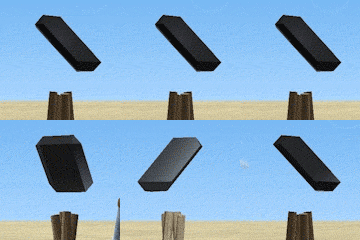
|
Yes | Using Disk 3 reveal unflawed solid gem. Rotate once on Z and cut to a nice clean edge. Flip and rotate so the edge is opposite Disk 2 in the same alignment and cut the prism shape. Use disk 1 to trim the ends to the desired length. | ||||
Ring |
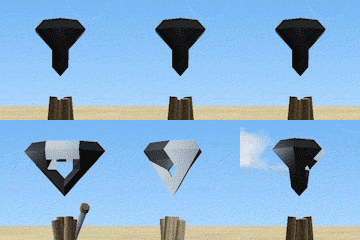
|
13 | Yes | Look for a 'T' shaped flaw. With Disk 1 carefully cut to shape, keeping solid edges around the stem of the 'T'. Use Disk 2 around the 'stem' flaw to make the top of the ring. Flip over and use Disk 3 to cut to the base on all four sides. | Ultra rare | ||
Shen of Horus |
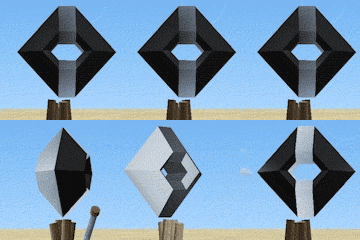
|
28 | No | two adjacent 3-deep flaws, surrounded by unflawed gem | crazy | ||
Solarkin |
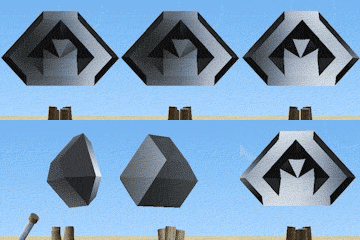
|
24 | No | Find the flaw combination and the battle is almost over. Carve away all sides with Disk 3 to create the outline. With the key flaws down and the top facing Disk 2 cut to form the base. Turn on Z twice and shape the top. | |||
Sprocket |
|
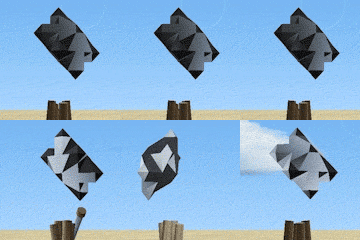
14 | Yes | Needs a relatively unflawed diagonal plane. Position a large corner triangle opposite Disk 3, and cut to 3 deep. Cut a three sided shape using Disk 2, twirling on -X once and -Z three times to reposition. Flip over to work the same way on the other side, cutting to the edge of the first facet on the first face. Not as hard as it looks. | All | ||
Suspension |
|
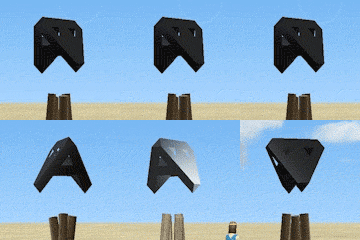
9 | Yes | Very like a Corner Heart to cut, except bigger and with the gap on the bottom. Find an 'eyelet' flaw (not on an edge) with solid on opposing sides. Turn the gem so the flaw is facing Disk 3 and cut to the centre of the flaw. Rotate on x twice and repeat. This will form the gap at the bottom of the cut between the two pointy legs. Rotate on Y to sit the gem on its legs and rotate on Z and use Disk 3 to shave away to form the distinctive shape. The 'dimples' will appear on the final cut. | |||
Symmetry |
|
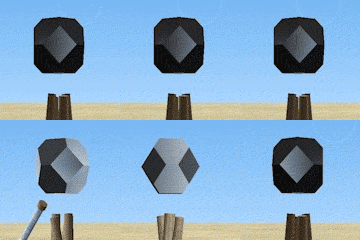
19 | Yes | Cut a 2x2x2 square of solid gem using Disk 1. Then use Disk 3 to shave off each corner. | All | ||
The Fox |
|
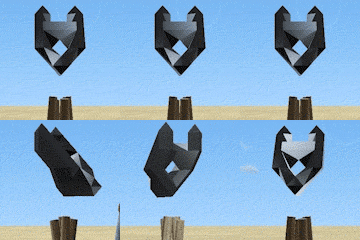
? | No | ||||
The Shark |
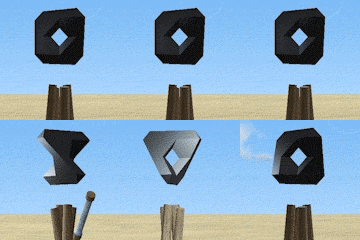
|
8 | Yes | Find and cut a Full Eye, then use Disk 3 to take away opposing corners. | Rare | ||
Thistle |
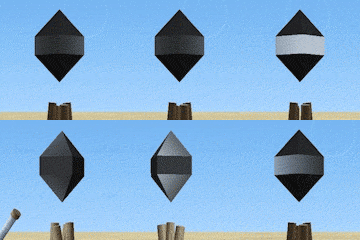
|
12 | Yes | One way to cut this is to use Disk 2 to make a long diamond shaped oblong. Turn it upright (y axis) and use Disk 3 to form one pointy end, rotating on z as you go. Then flip over and repeat on the other side until you complete the cut. | All | ||
Thoth's Knot |
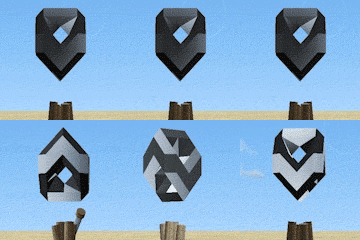
|
18 | No | Two lines of three flaws, crossing adjacent to one another, with solid gem beside each and 1 cell of gem above and below | Ultra rare | ||
Tiki Mask |
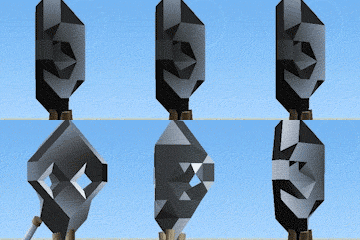
|
35 | No | Double-width one-deep vertex flaw | Ultra rare | ||
Tombstone |
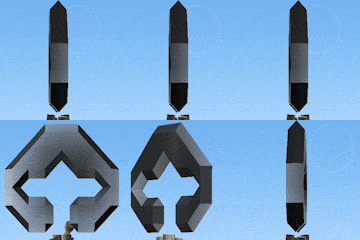
|
26 | No | ||||
Triclops |
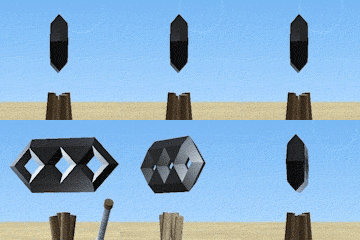
|
14 | Yes | Easy to cut once you spot the three single flaws in a row. Use Disk 1 to cut to a single layer, the remove the excess to the top and bottom of the row. Finally, use Disk 2 to neaten the edges. | Rare | ||
Unity |
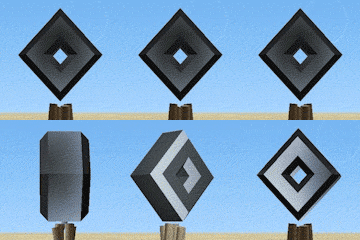
|
36 | Yes | Two-deep vertex flaw surrounded by an area of unflawed gem. The trick is to find the configuration of flaw and unflawed gem. To cut, look for a Full Eye surrounded by solid gem, and use Cutting Disk 2 to create the distinctive frame around the central flaw. | Ultra rare |