The Wiki for Tale 4 is in read-only mode and is available for archival and reference purposes only. Please visit the current Tale 11 Wiki in the meantime.
If you have any issues with this Wiki, please post in #wiki-editing on Discord or contact Brad in-game.
Difference between revisions of "User:Cegaiel/Macros"
| Line 202: | Line 202: | ||
[[Image:Cegaiel_carp4.jpg]] | [[Image:Cegaiel_carp4.jpg]] | ||
| + | |||
| + | |||
| + | ==Crematory== | ||
Revision as of 06:24, 14 January 2010
Instructions
Click the "Get Code!" links, below, for a copy/paste version of the code. Copy and Paste the script into Notepad and save as "something.ahk". Yes do put the quotation marks in the file name field as this will prevent it from being named something.ahk.txt.
Note: All of my scripts will work in any resolution, EXCEPT Carpentery Blade, which only works in 1024x768 mode. This particular script uses a method that can't be used with my tutorial below (Mouse clicks in any resolution), sorry!
Make sure you have AutoHotKey installed. Then double click the .ahk file from My Computer and it will launch it and appear as an icon in system tray. Then press the correct key combination (listed in comments for script) to execute the script.
At anytime, you can right click (Authohotkey icon in system tray) and choose Reload to start script over.
Get Mouse Position and Color (Autohotkey)
Just launch the script and it will show you this tooltip wherever you move the mouse. All the information on tooltip updates in realtime as you move the mouse.
I wrote this in case I need to find the mouse position that I need to click on or if I need to find the color of where my mouse is hovering.
I mainly added the color gathering portion in case I want to write a macro with the PixelSearch in autohotkey.
Example code for color:
This will search for the color 0xE1D4AC at mouse position 540,341. If it finds that color, at that position (within 10 shades) then if will return errorlevel = 0
PixelSearch, Px, Py, 540, 341, 540, 341, 0xE1D4AC, 10, Fast
if ErrorLevel = 0
{
MsgBox, Color detected
}else{
Msgbox, Color not found
}
Grass (Autohotkey)
Start script with Ctrl+Alt+G
Enter amount of grass to collect. Walks around in a circle and collects grass without moving too far from where you started. Great to get your Rhythmic Strength skill up. The reason this is a zip file is because it contains a .png image of the grass icon that needs to be in the same directory as the script.
Note recently IE downloads somtimes show the zip file as being corrupt. If you try to download and it shows the zip file as corrupt, then you will need to download and install Firefox to download correctly. Or, you can manually get the code and download the image, below.
Download Zip File (Script + Grass icon image)
-OR-
Get Code! -AND- Get Grass Image (Right click the link and choose Save Target As...)
Note: The .png file needs to be in same directory as the script.
Wheat (Beta) (Autohotkey)
Instructions:
Zoom in about half way (in F5 or F6) and lock your screen (Alt + L) to prevent your screen from moving around.
Start script with Ctrl+Alt+W
The script has GUI menus to walk you through the setup process, its very easy.
Basically here is how I do it. I first minimize my chat (so I dont forget and mess up the first watering). I plant my wheat beds next (before starting the script). Once planted, I quickly move and stand in the center of all the beds. Then quickly start the script and middle click your water icon. Then middle click all your wheat beds, press OK, drag the status bar so it doesn't cover any over your wheat beds, then sit back and enjoy the show. Don't worry about what you need to click, there is a GUI dialogue that will walk you through.
Supports unlimited beds, but I suggest you start out small (4-6 beds) until you get used to the script. It will hover each bed and send the H and W hotkey over each bed, back to back. Then it will wait 4 seconds and repeat the cycle.
Note you must have the chat minimized or else you will see HW appear in chat bar (will not send) repeatedly.
This macro you do NOT pin up any menus, it simply remembers where all your beds are and points to them and sends the H and W key back to back. By sending the H and W key at same time, this will ensure that it will [H]arvest the wheat (if its time) or [W]ater
Make sure you are standing along water, where you will be planting wheat. Make sure you have at least one EMPTY jug (Esc, Skills, Empty Jugs), before you start the script, so that the water icon is showing on top left corner.
When you start the script it will tell you to point and middle click your water icon. Then it will tell you to middle click (click your mouse scroll wheel) all of your wheat beds. Enter as many as you like. Then once you click OK, it will go to work. Once you start the script, you have 7 seconds (before script begins) to move the status bar out of the way of your wheat beds.
When you first activate the script, it will wait 3 mins and then click the water icon. Once it clicks the water icon, then it will wait another 3 mins to gather more water and so on. Most wheat beds need watering every 32-34 seconds. So every 3 minutes is more than enough for the water icon to appear. I usually keep about 50 water jugs on me.
Bonus Tactic: if you have a Water Mine, plant your wheat next to it. If a gem pops, then hit Ctrl+P to pause the macro and get your gem. Then hit Ctrl+P again to resume where you left off at.
By the way, I took a shortcut and revamped an old mining script, so you will see alot of references to mining in the script, ^_^
Plane Boards (Autohotkey)
Instructions: Zoom in about half way (in F5 or F6) and lock your screen (Alt + L) to prevent your screen from moving around.
Start script with Ctrl+Alt+W
It will walk you through the setup process with GUI Menus.
If you use multiple carpentry benches to make boards, then this is for you! It will now ask how many boards you want plane. Next a popup will tell you to middle click (click mouse wheel) all your carpentry benches. When done click OK. It will wait 7 seconds before the script begins. During this time, drag the status bar out of the way so it doesn't cover up any of the benches. Then it will start hovering all your benches and clicking the P key (equivalent to [P]lane Board), faster than you can. The more benches you have the faster you will plane a full inventory of wood.
Important: You MUST minimize chat for this to work correctly. If you dont, you will see the letter P appear in your chat bar over and over. It wont send it to chat if you forget, but you will notice it.
Fishing (Autohotkey)
Start script with Ctrl+Alt+F
It will walk you through with GUI menus, but heres what it will ask:
1) Enter how many times you want to cast (click the fishing icon)
2) It will ask you to hover and middle click your fishing icon
3) It will now begin fishing and pause 15 seconds between casts
What makes this better than some other fishing scripts?
- The fishing icon can change positions depending on where you are standing (ie mud, sand, etc). This script will ask you where the icon is...
- Once it reaches the the number of casts you entered, it will stop. Great if you fall asleep at your keyboard :P
Carpentry Blade 1024x768 (Autohotkey)
CREDIT: Full credit for the actual carp blade making portion goes to Oni's Carp Blade script, based off his ACTools macro. I simply converted it to Autohotkey and added some very useful features/hotkeys for more ease and flexiblity. I'm not a big Actools fan and I dont trust it to make more than 1 blade at a time (batches). Theres no way to tell if the blade you are about to start making is even in the right position or at what coords. And if you do get a good quality blade, you have to blindly hope you are pointing your mouse at the same spot when you make your next blade. The features I added to this script addresses all my issues.
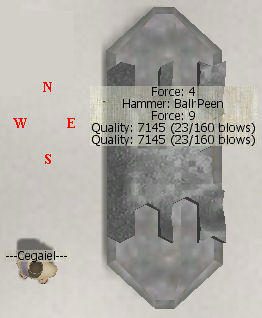
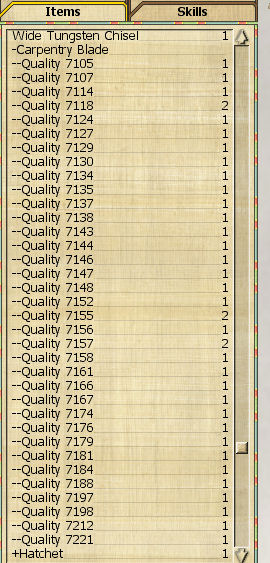
- Make 7.1k - 7.2k carpentry blades in about 10 seconds (Single keyboard click to repeat previously sucessful blades).
View last image below to see the consistency. - Works only in 1024x768 screen resolution
- Double F8 View zoom all the way in (script will do this automatically for you, so ignore this).
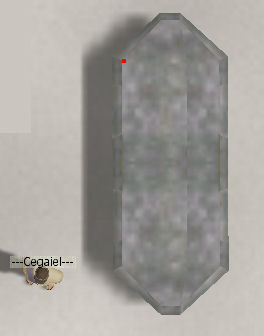
- Place mouse on starting position (while hovering red dot, in image 1 & 2, below).
- Press F2 to start making a blade (or Right Ctrl to make blade from a previously successful location - no need to move mouse with this option, position is irrelevent since it uses coords from memory)
Hotkeys: (That work while the script is active/idle)
- F1 Help Screen
- F2 Make a blade and store coordinates into script memory AND clipboard
Note: The only purpose of putting into clipboard is in case you're about to log out of the game. Next time you log on (assuming you didn't move your avatar, you can just click the same coords you were using your previous session (this is where Left Shift comes into play). You can paste your last coords with Ctrl+V into notepad at anytime for later reference. If your avatar moves even a half of a step, then those coords will not be valid anymore.
- Right Ctrl: Make another blade from last F2 coordinates (memory)
- Left Shift: Show current mouse position
- Right Shift: Show last F2 coordinates (memory)
Hotkeys you use after making a blade:
- Left Ctrl: Approve and unload a blade into your inventory (Automatically clicks Complete Project on menu).
Note: If you uncomment the next to last line: Gosub, Load (uncomment meaning remove the comment/ignore tag ;) then pressing Left Ctrl will not only unload the blade, but will execute RCtrl automatically after unloading. This means it will start another blade immediately (based on last valid F2 mouse position). Expedites making large quantities of blades. After you are comfortable with the script, I recommend you use this. - SPACEBAR: Discard project and recover metal (Automatically clicks Discard on menu)
Your Anvil MUST be aligned North to South. When loaded, the cutting edge of the blade must face West.
Why: When you Double F8, the screen automatically changes to have North at top of screen, South at bottom of screen.
Tips:
- If you keep getting 6800 quality blades no matter where you start blade/set coords with F2, then try to reposition your body a half a step or two. I found the best response to the script is to stand around where I am in screenshot, towards the bottom left corner. But standing at no higher (North) than the middle of the anvil.
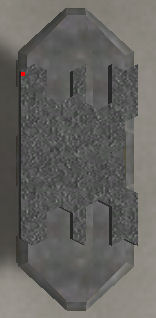
- It has been reported to me that someone using a flat screen monitor (which is wide screen) doesn't get the correct results as I do (I use an old style square shaped CRT monitor) when using the starting position that is recommended (the red dot in the F2 starting position images, below). I believe the script would still make the blade correctly, but you might need to find a new starting position to get the desired results. But I can not confirm this since I dont have a flat screen monitor. Basically, you want to find a starting position that will make the first click on the most upper, left corner of the loaded metal (see image directly below). If your first click hits that spot, then I believe it will finish the blade correctly.
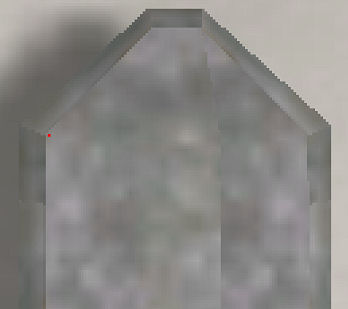
First blow should hit about here:
Starting position (Hit F2 here):
Look at the consistency:

