The Wiki for Tale 4 is in read-only mode and is available for archival and reference purposes only. Please visit the current Tale 11 Wiki in the meantime.
If you have any issues with this Wiki, please post in #wiki-editing on Discord or contact Brad in-game.
Difference between revisions of "User:Cegaiel/Macros/CarpBlade"
| Line 1: | Line 1: | ||
| − | + | ==Carpentry Blade 1024x768 (Autohotkey)== | |
| − | |||
| − | |||
| − | |||
| − | + | <b>CREDIT:</b> Full credit for the actual carp blade making portion goes to [[User:Oni/CarpBlade1024|Oni's Carp Blade]] script, based off his ACTools macro. I simply converted it to Autohotkey and added some very useful features/hotkeys for more ease and flexiblity. I'm not a big Actools fan and I dont trust it to make more than 1 blade at a time (batches). Theres no way to tell if the blade you are about to start making is even in the right position or at what coords. And if you do get a good quality blade, you have to blindly hope you are pointing your mouse at the same spot when you make your next blade. The features I added to this script addresses all my issues. | |
| − | |||
| − | |||
| − | |||
| − | |||
| − | |||
| − | |||
| + | [[User:Cegaiel/Macros/CarpBlade/Code |Get Code!]] | ||
| − | |||
| − | |||
| − | |||
| − | |||
| + | *Make 7.1k - 7.2k carpentry blades in about 10 seconds (Single keyboard click to repeat previously sucessful blades).<BR>View last image below to see the consistency. | ||
| + | *Works only in 1024x768 screen resolution | ||
| + | *Double F8 View zoom all the way in (script will do this automatically for you, so ignore this). | ||
| + | *Place mouse on starting position (while hovering red dot, in image 1 & 2, below). | ||
| + | *Press F2 to start making a blade (or Right Ctrl to make blade from a previously successful location - no need to move mouse with this option, position is irrelevent since it uses coords from memory) | ||
| − | |||
| − | |||
| − | |||
| + | <b>Hotkeys:</b> (That work while the script is active/idle) | ||
| + | *F1 Help Screen | ||
| + | *F2 Make a blade and store coordinates into script memory AND clipboard | ||
| + | <B>Note:</b> The only purpose of putting into clipboard is in case you're about to log out of the game. Next time you log on (assuming you didn't move your avatar, you can just click the same coords you were using your previous session (this is where Left Shift comes into play). You can paste your last coords with Ctrl+V into notepad at anytime for later reference. If your avatar moves even a half of a step, then those coords will not be valid anymore. | ||
| + | *Right Ctrl: Make another blade from last F2 coordinates (memory) | ||
| + | *Left Shift: Show current mouse position | ||
| + | *Right Shift: Show last F2 coordinates (memory) | ||
| − | |||
| − | |||
| − | |||
| − | |||
| − | |||
| − | |||
| − | |||
| − | |||
| − | |||
| − | |||
| − | |||
| + | <b>Hotkeys you use after making a blade:</b> | ||
| + | *Left Ctrl: Approve and unload a blade into your inventory (Automatically clicks Complete Project on menu).<br><b>Note:</b> If you uncomment the next to last line: <b>Gosub, Load</b> (uncomment meaning remove the comment/ignore tag <b>;</b>) then pressing Left Ctrl will not only unload the blade, but will execute RCtrl automatically after unloading. This means it will start another blade immediately (based on last valid F2 mouse position). Expedites making large quantities of blades. After you are comfortable with the script, I recommend you use this. | ||
| + | *SPACEBAR: Discard project and recover metal (Automatically clicks Discard on menu) | ||
| − | + | <b>Your Anvil MUST be aligned North to South. When loaded, the cutting edge of the blade must face West.</b><BR>Why: When you Double F8, the screen automatically changes to have North at top of screen, South at bottom of screen. | |
| − | |||
| − | |||
| − | |||
| − | |||
| − | |||
| + | [[Image:Cegaiel_carp1.jpg]] | ||
| − | |||
| − | |||
| + | <b>Tips:</b> | ||
| + | *If you keep getting 6800 quality blades no matter where you start blade/set coords with F2, then try to reposition your body a half a step or two. I found the best response to the script is to stand around where I am in screenshot, towards the bottom left corner. But standing at no higher (North) than the middle of the anvil. | ||
| + | *It has been reported to me that someone using a flat screen monitor (which is wide screen) doesn't get the correct results as I do (I use an old style square shaped CRT monitor) when using the starting position that is recommended (the red dot in the F2 starting position images, below). I believe the script would still make the blade correctly, but you might need to find a new starting position to get the desired results. But I can not confirm this since I dont have a flat screen monitor. Basically, you want to find a starting position that will make the first click on the most upper, left corner of the loaded metal (see image directly below). If your first click hits that spot, then I believe it will finish the blade correctly. | ||
| − | |||
| − | |||
| − | |||
| − | |||
| − | |||
| − | |||
| − | |||
| − | |||
| − | + | First blow should hit about here: | |
| + | [[Image:Cegaiel_carp5.jpg]] | ||
| − | |||
| − | + | <B>Starting position (Hit F2 here):</b> | |
| − | + | {| cellpadding="2" border="1" cellspacing="0" width="180%" | |
| − | + | [[Image:Cegaiel_carp2.jpg]] | |
| − | + | |- | |
| − | + | [[Image:Cegaiel_carp3.jpg]] | |
| − | + | |} | |
| − | |||
| − | |||
| − | |||
| − | |||
| − | + | <b>Look at the consistency:</b> | |
| − | + | [[Image:Cegaiel_carp4.jpg]] | |
| − | |||
| − | |||
| − | |||
| − | |||
| − | |||
| − | |||
| − | |||
| − | |||
| − | |||
| − | |||
| − | |||
| − | |||
| − | |||
| − | |||
| − | |||
| − | |||
| − | |||
| − | |||
| − | |||
| − | |||
| − | |||
| − | |||
| − | |||
| − | |||
| − | |||
| − | |||
| − | |||
| − | |||
| − | |||
| − | |||
| − | |||
| − | |||
| − | |||
| − | |||
| − | |||
| − | |||
| − | |||
| − | |||
| − | |||
| − | |||
| − | |||
| − | |||
| − | |||
| − | |||
| − | |||
| − | |||
| − | |||
| − | |||
| − | |||
| − | |||
| − | |||
| − | |||
| − | |||
| − | |||
| − | |||
| − | |||
| − | |||
| − | |||
| − | |||
| − | |||
| − | |||
| − | |||
| − | |||
| − | |||
| − | |||
| − | |||
| − | |||
| − | |||
| − | |||
| − | |||
| − | |||
| − | |||
| − | |||
| − | |||
| − | |||
| − | |||
| − | |||
| − | |||
| − | |||
| − | |||
| − | |||
| − | |||
| − | |||
| − | |||
| − | |||
| − | |||
| − | |||
| − | |||
| − | |||
| − | |||
| − | |||
| − | |||
| − | |||
| − | |||
| − | |||
| − | |||
| − | |||
| − | |||
| − | |||
| − | |||
| − | |||
| − | |||
| − | |||
| − | |||
| − | |||
| − | |||
| − | |||
| − | |||
| − | |||
| − | |||
| − | |||
| − | |||
| − | |||
| − | |||
| − | |||
| − | |||
| − | |||
| − | |||
| − | |||
| − | |||
| − | |||
| − | |||
| − | |||
| − | |||
| − | |||
| − | |||
| − | |||
| − | |||
| − | |||
| − | |||
| − | |||
| − | |||
| − | |||
| − | |||
| − | |||
| − | |||
| − | |||
| − | |||
| − | |||
| − | |||
| − | |||
| − | |||
| − | |||
| − | |||
| − | |||
| − | |||
| − | |||
| − | |||
| − | |||
| − | |||
| − | |||
| − | |||
| − | |||
| − | |||
| − | |||
| − | |||
| − | |||
| − | |||
| − | |||
| − | |||
| − | |||
| − | |||
| − | |||
| − | |||
| − | |||
| − | |||
| − | |||
| − | |||
| − | |||
| − | |||
| − | |||
| − | |||
| − | |||
| − | |||
| − | |||
| − | |||
| − | |||
| − | |||
| − | |||
| − | |||
| − | |||
| − | |||
| − | |||
| − | |||
| − | |||
| − | |||
| − | |||
| − | |||
| − | |||
| − | |||
| − | |||
| − | |||
| − | |||
| − | |||
| − | |||
| − | |||
| − | |||
| − | |||
| − | |||
| − | |||
| − | |||
| − | |||
| − | |||
| − | |||
| − | |||
| − | |||
| − | |||
| − | |||
| − | |||
| − | |||
| − | |||
| − | |||
| − | |||
| − | |||
| − | |||
| − | |||
| − | |||
| − | |||
| − | |||
| − | |||
| − | |||
| − | |||
| − | |||
| − | |||
| − | |||
| − | |||
| − | |||
| − | |||
| − | |||
| − | |||
| − | |||
| − | |||
| − | |||
| − | |||
| − | |||
| − | |||
| − | |||
| − | |||
| − | |||
| − | |||
| − | |||
| − | |||
| − | |||
| − | |||
| − | |||
| − | |||
| − | |||
| − | |||
| − | |||
| − | |||
| − | |||
| − | |||
| − | |||
| − | |||
| − | |||
| − | |||
| − | |||
| − | |||
| − | |||
| − | |||
| − | |||
| − | |||
| − | |||
| − | |||
| − | |||
| − | |||
| − | |||
| − | |||
| − | |||
| − | |||
| − | |||
| − | |||
| − | |||
| − | |||
| − | |||
| − | |||
| − | |||
| − | |||
| − | |||
| − | |||
| − | |||
| − | |||
| − | |||
| − | |||
| − | |||
| − | |||
| − | |||
| − | |||
| − | |||
| − | |||
| − | |||
| − | |||
| − | |||
| − | |||
| − | |||
| − | |||
| − | |||
| − | |||
| − | |||
| − | |||
| − | |||
| − | |||
| − | |||
| − | |||
| − | |||
| − | |||
| − | |||
| − | |||
| − | |||
| − | |||
| − | |||
| − | |||
| − | |||
| − | |||
| − | |||
| − | |||
| − | |||
| − | |||
| − | |||
| − | |||
| − | |||
| − | |||
| − | |||
| − | |||
| − | |||
| − | |||
| − | |||
| − | |||
| − | |||
| − | |||
| − | |||
| − | |||
| − | |||
Revision as of 19:15, 14 January 2010
Carpentry Blade 1024x768 (Autohotkey)
CREDIT: Full credit for the actual carp blade making portion goes to Oni's Carp Blade script, based off his ACTools macro. I simply converted it to Autohotkey and added some very useful features/hotkeys for more ease and flexiblity. I'm not a big Actools fan and I dont trust it to make more than 1 blade at a time (batches). Theres no way to tell if the blade you are about to start making is even in the right position or at what coords. And if you do get a good quality blade, you have to blindly hope you are pointing your mouse at the same spot when you make your next blade. The features I added to this script addresses all my issues.
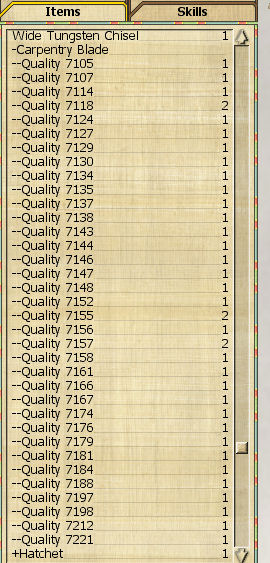
- Make 7.1k - 7.2k carpentry blades in about 10 seconds (Single keyboard click to repeat previously sucessful blades).
View last image below to see the consistency. - Works only in 1024x768 screen resolution
- Double F8 View zoom all the way in (script will do this automatically for you, so ignore this).
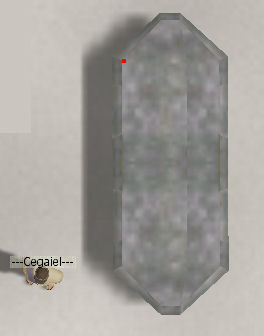
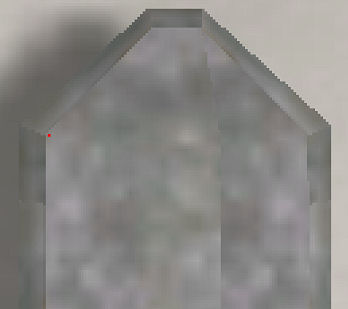
- Place mouse on starting position (while hovering red dot, in image 1 & 2, below).
- Press F2 to start making a blade (or Right Ctrl to make blade from a previously successful location - no need to move mouse with this option, position is irrelevent since it uses coords from memory)
Hotkeys: (That work while the script is active/idle)
- F1 Help Screen
- F2 Make a blade and store coordinates into script memory AND clipboard
Note: The only purpose of putting into clipboard is in case you're about to log out of the game. Next time you log on (assuming you didn't move your avatar, you can just click the same coords you were using your previous session (this is where Left Shift comes into play). You can paste your last coords with Ctrl+V into notepad at anytime for later reference. If your avatar moves even a half of a step, then those coords will not be valid anymore.
- Right Ctrl: Make another blade from last F2 coordinates (memory)
- Left Shift: Show current mouse position
- Right Shift: Show last F2 coordinates (memory)
Hotkeys you use after making a blade:
- Left Ctrl: Approve and unload a blade into your inventory (Automatically clicks Complete Project on menu).
Note: If you uncomment the next to last line: Gosub, Load (uncomment meaning remove the comment/ignore tag ;) then pressing Left Ctrl will not only unload the blade, but will execute RCtrl automatically after unloading. This means it will start another blade immediately (based on last valid F2 mouse position). Expedites making large quantities of blades. After you are comfortable with the script, I recommend you use this. - SPACEBAR: Discard project and recover metal (Automatically clicks Discard on menu)
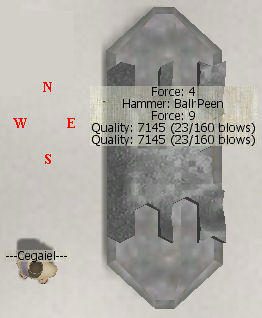
Your Anvil MUST be aligned North to South. When loaded, the cutting edge of the blade must face West.
Why: When you Double F8, the screen automatically changes to have North at top of screen, South at bottom of screen.
Tips:
- If you keep getting 6800 quality blades no matter where you start blade/set coords with F2, then try to reposition your body a half a step or two. I found the best response to the script is to stand around where I am in screenshot, towards the bottom left corner. But standing at no higher (North) than the middle of the anvil.
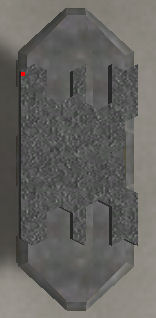
- It has been reported to me that someone using a flat screen monitor (which is wide screen) doesn't get the correct results as I do (I use an old style square shaped CRT monitor) when using the starting position that is recommended (the red dot in the F2 starting position images, below). I believe the script would still make the blade correctly, but you might need to find a new starting position to get the desired results. But I can not confirm this since I dont have a flat screen monitor. Basically, you want to find a starting position that will make the first click on the most upper, left corner of the loaded metal (see image directly below). If your first click hits that spot, then I believe it will finish the blade correctly.
First blow should hit about here:
Starting position (Hit F2 here):
Look at the consistency:
