The Wiki for Tale 5 is in read-only mode and is available for archival and reference purposes only. Please visit the current Tale 11 Wiki in the meantime.
If you have any issues with this Wiki, please post in #wiki-editing on Discord or contact Brad in-game.
Difference between revisions of "Epreuve du Safari"
m (Created page with "{{Languages|Test_of_the_Obelisk}}<br> <table ALIGN="center" BORDERCOLOR="#EFDFBD" BGCOLOR="#EFDFBD" border="0"> <tr> <td> Image:Tale5.jpg</td> <td width=100></td> <td> [[M...") |
m (→Rat du désert) |
||
| Line 116: | Line 116: | ||
* Les traces ne disparaissent pas aussitôt après la capture du rat : il est donc possible de trouver des traces "vides". | * Les traces ne disparaissent pas aussitôt après la capture du rat : il est donc possible de trouver des traces "vides". | ||
* Les rats sont notoirement suicidaires : ils n'hésitent pas à sauter d'une falaise ou à se noyer dans un point d'eau. Ils sont capables (comme les gazelles) de grimper une falaise d'un seul bond. | * Les rats sont notoirement suicidaires : ils n'hésitent pas à sauter d'une falaise ou à se noyer dans un point d'eau. Ils sont capables (comme les gazelles) de grimper une falaise d'un seul bond. | ||
| − | |||
| − | |||
=== Fennec === | === Fennec === | ||
Revision as of 14:55, 28 March 2011
 |
Page Principale | Bâtiments | Ressources | Guides | Epreuves | Compétences | Technologies |  |
| Discipline | ||
|---|---|---|
| Nécessite | ||
| ||
| Pour passer le principe : | ||
| ||
| Demonstré par Phoenixwcu à Celaeno le 2010-8-13. | ||
Epreuve du Safari
Pour montrer vos aptitudes, traquez les animaux d'Egypte afin de les attrapez puis de les relâcher. Serez vous assez rusé, rapide et fort pour attraper 4 individus de chacune des 7 espèces animales ?
Liste des animaux à capturer
- Ibis (en fait un flamant rose)
- Gazelle
- Fennec
- Crapaud
- Rat du désert (gerboise)
- Loutre (marmotte)
- Faucon
Soit un total de 28 animaux.
A chaque fois que vous attrapez 4 animaux de cette liste (ils n'ont pas besoin d'être de la même espèce), vous gagnez 1 point permanent de force.
Vous pouvez savoir quels animaux vous avez déjà capturés par le menu de l'avatar -> épreuves -> Safari.
Les techniques de chasse
Ibis
 |
Il n'existe qu'une seule colonie d'environ 25 ibis pour toute l'Egypte.
Le fait de capturer un de ces oiseaux le fait disparaître mais ne perturbe pas les autres. Chaque matin à 6 heures, la colonie s'installe dans une nouvelle région (toujours près du rivage) et y reste jusqu'à 6 heures du soir (si toutefois tous les ibis n'ont pas été capturés avant).
Il est recommandé aux joueurs qui découvrent la colonie de le faire savoir sur le canal national : Egypt ou au moins sur le canal régional afin que le message soit relayé sur tout le pays. Un même joueur ne peut en effet capturer qu'un seul ibis par jour (réel) : il est donc inutile de dissimuler l'information. Indiquez bien les coordonnées de l'endroit, la région dans lequel il se trouve et si possible une indication quand aux environs (près d'une école, la direction par rapport au chariot, ....).
Il est aussi bien vu que l'un des joueurs reste sur place pour annoncer le nombre d'oiseaux restants, afin que les autres ne viennent pas pour rien et que ces derniers fassent savoir qu'ils sont en route.
Crapaud
Les crapauds sont experts en camouflage mais c'est leur chant si reconnaissable qui fait leur perte.
Les crapauds sont invisibles : vous devez donc les localiser grâce à leurs croassements. Il se manifestent entre 18h et 6h du matin (à vérifier pour T5). Ils croassent approximativement toutes les 30 ou 60 secondes et sont entendus sur 60 à 90 coordonnées aux alentours. Ils sont toujours situés prés d'un point d'eau.
Conseils :
- Tout d'abord, soyez sûr d'avoir votre casque audio, ou des haut parleurs qui fonctionnent.
- Sachez d'autre part, que le son sera orienté en fonction de votre caméra et non en fonction de votre avatar : il vous est donc possible d'écouter dans des directions différentes sans bouger. Testez successivement les direction est / ouest et nord / sud.
- Quand un "croac" survient, il est habituellement plus fort dans l'un des hauts-parleurs. Marquez l'endroit où vous vous trouvez (en abandonnant de l'herbe, du sable ou de la boue) puis courez dans la direction du son sur 10 coordonnées et attendez.
- Recommencez la même opération jusqu'à ce que le croassement provienne de l'autre haut parleur puis revenez sur vos pas de 5 coordonnées (essayez de situer l'endroit où le bruit est le plus fort).
- Tournez la caméra de 90° et répétez ce procédé jusqu'à ce que vous entendiez aussi le croassement aussi fort dans les deux directions.
Cliquez sur vous même -> épreuves -> Safari-> Capturer un Crapaud Taureau. Cette action enclenche un timer d'endurance.
http://www.darkwood.demon.co.uk/PC/meter.html
Rat du désert
Les rats du désert sont également invisibles mais ce sont les traces qu'ils laissent sur le sol qui les trahissent.
- La première chose à faire quand vous souhaitez attraper un rat du désert est de conserver en inventaire 1 tissage et 4 planches afin de pouvoir poser un piège lorsque vous trouvez la trace du rat (menu de l'avatar -> projets -> épreuves). Contrairement aux autres bâtiments, ils sont invisibles mais les ressources disparaissent de votre inventaire.
Si vous échouez à attraper le rat, vos ressources ne sont pas perdues : vous pouvez donc essayer à nouveau avec les mêmes après un court timer d'endurance.
- La deuxième chose est de vérifiez que votre option : voir les ombres est bien active (menu de l'avatar -> options -> vidéo -> Shadow quality au moins au 2ème cran).
- Trouvez des traces dans le désert (sur le sable ou sur l'herbe) et suivez les dans la direction des orteils. Punaisez le menu de pose de piège sur votre écran. Plus les traces sont fraiches et plus elles sont proches l'une de l'autre (le vent efface peu à peu les traces anciennes). Lorsque vous arrivez au bout de la ligne, vous voyez apparaître une nouvelle empreinte (environ une toutes les 10 secondes). Placez vous exactement dessus et posez votre piège.
NOTES :
- Il est possible que les traces tournent en rond et se recoupent rendant leur suivi difficile.
- Les traces ne disparaissent pas aussitôt après la capture du rat : il est donc possible de trouver des traces "vides".
- Les rats sont notoirement suicidaires : ils n'hésitent pas à sauter d'une falaise ou à se noyer dans un point d'eau. Ils sont capables (comme les gazelles) de grimper une falaise d'un seul bond.
Fennec
Official game info from University of Body:
Build a Fennec trap using boards and rope. Each night, traps on the outskirts of a pack will show signs of the creatures, and traps within 250 coordinates will capture one. At least four different subspecies of Fennecs must be captured and released.
Fennecs are a species of desert fox. They are officially adorable.
- Building a Fennec trap takes 4 Boards and 1 Rope and can only be build on sandy soil (when sand icon is shown).
- Checking your traps once per Egyptian day should be sufficient, since the status might only change once per day, at 4:00am.
- There are at least 6 kinds of Fennecs. One each of 4 different sub-species must be captured. Sub-species include:
- Pygmy
- Short-haired
- Sharp-toothed
- Ruddy
- Bushy-tailed
- Furry
- Brown
- There are 3 possible messages:
- "The Trap is perfectly clean, not even a Fennec hair to be seen.", which means that there are no fennecs near. Or the trap has been checked earlier that day and had a fennec in it!
- "Although the trap doesn't contain a live animal, you definitely see signs of Furry Fennecs!", which means that a fennec should be within 250 to 600 coordinates. Build more traps within that range (outside the 250 coords circle). {note the outer most limit of "you see signs of Furry Fennecs!" will be 1000 coords from the center point. you will get the "not even a Fennec hair to be seen" sign beyond 1000}
- "You have captured a Furry Fennec! You let the little fellow go to rejoin his pack.", which means that you will have captured a fennec of a specific subspecies, as indicated.
- After you have captured all 4 subspecies of fennecs, it is a good custom to make your trap usable by anyone, to help others find good locations for capturing fennecs. Announcing locations to your friends, guild chat or even public chat might be helpful. Listing them here is also a good idea.
Separate page for Fennec locations (map/table.)
Pro-tip:
- An easy way to catch fennecs is if someone announces a capture of a type you have not caught, build a trap 250 coordinates away in each cardinal direction from the announced capture point.
 This must be done before the fennecs move at 2:00am. After 2:00am, check your four traps and one will have a fennec!
- tehm: I dropped traps between 2am and 3:30am, checked after 4am and mine were all still clean, but other public traps in the area showed signs. They may move at a different time now.
- New traps have to built before 2am and then checked after the move at 2am - BG

Gazelle
Official game info from University of Body:
Gazelles run faster than humans. The key to tagging a Gazelle is to tire it out. Strong teamwork is a must.
The method of tagging a gazelle described below is merely meant as a suggested way to do it. However, it has proven to be a very successful way to have as many people as possible benefit from it. If this method is used correctly, everyone in the group should have a chance to tag it. Because of this, and especially because it's very hard (if not impossible) to do this by yourself, the method described below is recommended.
- Gazelles appear randomly in Egypt. Could be anywhere, but mostly in less populated areas.
- Unless completely hyped with speed/dexterity bonuses, it's almost impossible to capture a Gazelle by yourself or even with only a few people.
- It is custom to announce a gazelle in an Egypt-wide channel like Egypt and form a large group. Let people come in, even if it takes half an hour.
- Everyone should position around the gazelle in a circle (like in the image above) and when the group is complete, one person should be appointed leader.
- If the circle around the gazelle is wide enough and nobody approaches the gazelle, the gazelle is almost guaranteed to just stand there.
- If the gazelle is close to an unpassable body of water (steep cliffs don't work, they can walk up there, even if 90 degrees), it is easier to enclose it. Making a double lined half-circle around it can be considered.
- On command of the leader, the group decreases the size of the circle slowly, moving in on the gazelle step by step.
- The gazelle will panic and move around. Warping a few coordinates in any direction is also possible. The gazelle is likely to escape from the circle.
- From this moment on, the group should chase the gazelle, but keep a certain distance. If the gazelle stops running, form a new circle around it and start over.
- When a gazelle has become tired, this is visible because it will let it's head hang down. Up to this moment, it's head will be upright.
- When this happens (tiring it out), it will not move until it gathers new energy to run again. This status will remain for about 10-20 seconds.
- The leader of the group signals everyone to tag. At this point, everyone can run up to the gazelle and click it. After tagging it, a popup should appear for each individual who tags it.
- As soon as you've tagged it, it is important to move away from the gazelle again. If not everyone has had the chance to tag it, this might be a way to keep it in sight and repeat the process.
- After regaining energy, the gazelle will run away again. Everyone who has not tagged it by then, should say so. If this is a reasonable large percentage of the group, try chasing it again.
Falcons
Official game info from University of Body:
To identify a Falcon Roost, drop a Rabbit. A falcon will take it sometime within the next 5 minutes (but never within the first minute), and will fly off toward the nearest roost. Trees may be checked for roosts, but doing so is exhausting!
- Searching a tree for falcon roosts triggers a 120-second endurance timer.
- You must have Fast gather from trees disabled under One-Click Options in order to search for falcon roosts.
- Dropping a rabbit isn't completely necessary to find falcons. There's always a tiny chance of finding the falcon roost in any tree (though the chance is very low).
- When you drop a rabbit, wait for a few minutes till it disappears. When that happens, read in your Main chat screen in which direction (North, South, East, West, Northeast, Southeast, Northwest, Southwest) you can look. Please bear in mind that this includes any tree in that direction along all of Egypt. The directions aren't very precise; for example North could also be leaning towards Northeast or Northwest. Use the map (F3) or compass (F4) to determine the direction to search.
- A tool to triangulate falcons can be found at http://hem.bredband.net/titgar/FalconFinder2.html
- Twice, immediately after finding a falcon, I dropped a rabbit for a falcon, watched it go one direction, dropped a second rabbit in the same place, only to see the falcon fly in a completely different direction. As a result, I conclude that FalconFinder2 is useless, also see above comment about the directions not being precise. I suggest simply dropping a rabbit, watching falcon fly off, searching 5-10 nearby trees roughly in direction indicated, then give up and drop another rabbit to reset the falcon's location. This produced falcons every 3-4 rabbits without a lot of running around. -Ikuu
- As a contrary opinion, I tracked a falcon using falcon finder across 3 regions and it was entirely accurate - it narrowed the possible region down to just one oasis using 4-5 rabbits, and the falcon was in the first tree I tried. --Inkoaten 09:25, 22 April 2009 (EST)
- If there is indeed only one falcon in Egypt at a time, someone catching it will cause the direction to change as you start orienting on the new one. Falcon finder can only show you where a falcon is, not who else might be hunting it. JulianJaynes 20:36, 3 May 2009 (EST)
- 10/1/10: Used about 20 bunnies running around in circles in a small area. Had RosieRazor help confirm i was not crazy. Rosie and I each dropped a bunny in the exact same spot. Mine went SE, her's went SW. Moved Directly south 20 coords and dropped a falcon. That one went North. Conclusion: Gave up. Oni.
- 10/27/10: I have found FalconFinder to be extremely usefull. Having found all 4 of my falcons with as little as 4 and at the most 8 rabbits. I drop one rabbit and follow indicated direction on falcon finder for aprox 700 to 1K cords and drop another and re-enter info. Doing this has led to captures in an average of 2 hrs with the longest taking me almost 5. Articgrey 02:17, 27 October 2010
- The closer you get to the falcon, the less accurate the directional information from dropping a rabbit. This is not a bug. JulianJaynes 17:38, 30 June 2009 (EST)
- I tracked 2 falcons simultaneously via chariot hops. There are at least two in Egypt, though they may not always appear at the same time. --Wrongskian
- Note that altars interfere with bunny-dropping. I dropped a rabbit three times near an altar (about 10 coords away) and waited over 10 minutes each time without falcons taking them. I had no idea what was wrong, but thankfully someone on Egypt filled me in -- moving about 50 coords away and dropping a bunny again did the trick.
Ibis
Official game info from University of Body:
Otters
Official game info from University of Body:
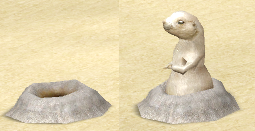
Otters build an underground network of tunnels. It is possible to put a board down to block a portion of the network, but if too many holes are blocked, the otter will get annoyed and eat a board!
Note: From what I gather, all, but one, of the 12 holes have 4 escape routes. It is impossible to capture an otter from a hole with 4 escape routes. Your job is to find the hole that only has 3 escape routes and use the 3 boards to block those holes. As soon as you see a hole has 4 escape routes, then thats a good candidate to put a board in. ~ Cegaiel
Note #2: Some holes have 5 exits so don't assume all just have 4 options ~ Dianess
- Each otter has 12 holes that it can escape to, and mock you from.
- Try catching the otter and map which holes it escapes to. Using your 3 boards to force it to specific holes, eventually you will find one hole with only 3 exits in which you should put your boards.
- While out and bout to trap otters carry a avg of 20 boards on you. It appears this tale the otters are fixed...not like last tale. This tale you must trap them between 3 holes now. Easy way to do this is to map out the hole locations, if more than 3 boards are placed wrong the otter will eat the boards.
- Note - Otters seem to put up with a variable number of boards ... a guildmate had one eaten when he placed more than 3 boards, I've had one eaten on more than 4 (eaten when a 5th was placed) and my wife had one eaten a board on the placement of the 10th board. - Tahrqa
- I caught one after placing 7 boards, with none eaten. Probably just lucky, though. --Shebi 20:44, 11 February 2009 (EST)
- Also Note: Once caught the holes (and any boards in them) disappear.
- Sometimes an otter's holes can be hidden by objects like mines, quarries, and warehouses.
- Otters can be found in grassland or desert: in that case, their holes look like silt (but brownish), or a round version of a flimsy brick rack, if you will.
- Otters can be "tag-teamed," meaning that two people may put three boards each into otter holes. However, the otter will still escape if boards are not blocking all exits from the hole he's in.
- One method of catching an otter: get a piece of graph paper. Run around and find and map all holes on your graph paper. Note which hole the otter is presently in and mark that hole number 1 and try to catch the otter. Find the hole that the otter went to next and mark that number 2. You now know that holes 1 and 2 are connected. Try to catch the otter again. Mark the hole that the otter escapes to number 3. You now know that holes 2 and 3 are connected. Continue in this matter until you have a pretty good idea of which holes are connected to each other. In this way you will be able to determine the otter's escape routes from each hole. Once you have figured out which hole has only three escape routes, you will be able to place your boards in the escape route holes and capture the otter. This takes TIME. It took me over an hour to map the holes and determine where to catch the otter. Best of luck to you!!
- A simple mapping method:
- Turn off your "auto pick up piles of 50 or fewer items" option.
- Pick up 78 sand.
- Drop 1 sand by the first hole you find.
- Drop 2 sand by the next hole you find.
- Continue until you've labeled each hole with a sand bucket.
- Locate the otter, click on the sand bucket to see which number hole this is, and write it down. Try to catch the otter.
- Relocate the otter, click on the sand bucket to see which number hole this is, draw an arrow from your first number and write down the second one.
- Continue with mapping and blocking as above.
- Basically, this avoids having to keep track of coords, where holes are in relation to each other, etc. You always know which hole it is immediately just by checking the bucket.
- Another otter catching method. This should only use 3-4 boards and take about 5 minutes if you know generally where all of the holes are. - Engine
- Move to the first hole that has an otter and try to catch it; place a board in this hole,
- Find the hole the otter has moved to and mark it with a piece of grass. This will be the hole you want it finish up in,
- Click on the otter and move to the new hole,
- If the otter moves back to the hole marked with grass, put a board in the hole it just came from and click on the otter again,
- Repeat the last two steps until you've caught the otter
- Additional tips (Wrel):
- Map your progress in a text editor or spreadsheet, with a column for each hole and a row for all escape routes for that hole.
- Escape routes are 2-way, so if the otter can go from hole 1 to hole 2, it can also go from hole 2 to hole 1. Therefore, new escape routes add 2 entries to your chart.
- You can always place up to 3 boards without any being eaten.
- When mapping escape routes, if the otter's at a whole that has 3 or less known escapes, board up all of the escape routes you already know about - this forces it to go somewhere new, if it can. (Make sure to remove all the boards from other holes first.) Now you'll either know another escape route for that hole, or you'll get lucky and actually capture the otter.
- Links
- Otterspawn at 100, 5100 in Taygete - MrStoned
- Otterspawn at 1677, -5583 in Maia - MrIgnem


